
How to make a paper snowflake Christmas ornament | DIY
The other day my daughter was sitting on the floor of my office playing with a few of my paper punches and trying her best to use up all my paper, when an idea suddenly popped into my head for an ornament.
After playing around with a few ideas and wasting even more paper, I came to the conclusion that I had a really cute (and super cheap) homemade gift idea, or nifty little holiday decoration…and it’s pretty ridiculously simple, too. I know it’s a million degrees outside and Christmas is forever away, but well…I’ll just play the “Christmas in July” card…and aside from that, it’s never too early to start thinking about Christmas gifts, right?
No grumbling about how it’s too early for Christmas. ChristmasChristmasChristmas! Okay, let’s go!
Here’s what you’ll need:
- A Styrofoam ball. I used a 3″ size, but you could use any size you want.
- A paper punch with a cool shape, as long as it’s relatively small; I would stick with an inch or less. For this ornament, I used a 1″ Martha Stewart snowflake punch. (Curse you, Martha Stewart craft section at Michaels…curse you).
- 2 sheets of white cardstock.
- Lots and lots of straight pins
- Lots and lots of sequins…I used aqua blue.
- Glitter (Thanks again, Martha..)
- About 6″ of ribbon to make the hanger
- And…nothing else. I’ll just continue with this extra bullet point here so this ornament seems more intricate than it really is.
- Oh wait, there IS something else…glue, of course! (You know how some bartenders wear a bottle opener strapped to their arm? I wear glue like that).
First you’ll need to punch out lots of little snowflakes (or whatever shape you are using). The number of punches will vary depending on the size of your punch and the size of your styrofoam ball…for my snowflake ornament, I probably used about 100 snowflakes. (I also doubled them up…see below). I used cardstock for this shape, because the edges of the snowflake were so flimsy, and I was afraid thinner paper would rip or bend easily…but a thinner (and less painful to punch out a million pieces of) paper would probably work perfectly fine for a more solid shape.

After I punched out all the little snowflakes and my hand cramps had subsided, I decided I wanted to sparkle them up a little bit with some white glitter…if you want to do this too, just spread them out on a newspaper, and lightly (lightly!) spray a tiny bit (a tiny bit!) of glue across them, and then sprinkle on the glitter. I sprayed a little too much on a few of the snowflakes, and those poor guys didn’t make it. And so, just a teeny bit (a teeny bit!) will do the trick (the trick!).

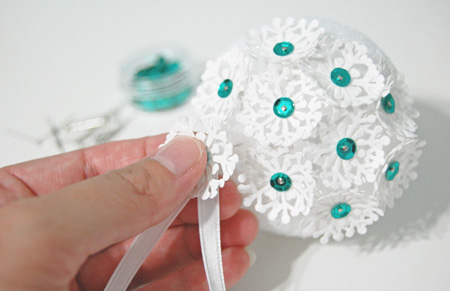
Finally time to start making the ornament…add a sequin to a pin, and then stick the pin through the centers of two snowflakes. I doubled up the snowflakes, unevenly, to make them look more full, but you may not need or want to do this with other shapes.

And then stick that one, and a whole bunch more, into the Styrofoam ball…easy peasy, snowflake squeezy.

At some point before your ball is covered, just put one of your snowflake-d pins through the ends of a loop of ribbon…

…and pin it down. (I like to add a little glue to the end of the pin before pushing it into the foam ball, for some added security).

And once the entire ball is covered…your ornament is done! How awesome and simple is that?!

These would look so cute on the Christmas tree…or a few grouped together in a bowl…just think of all the things you could do. Maybe some tiny beads instead of sequins…different colors and patterns and shapes of cardstock…
Or something a little dressier? A shimmery red and silver tablescape idea, perhaps?

Tell me what you think! Any other ways to vary this idea up?
P.S. Here’s a pinnable!

Love it! Simple and classy. I wonder how this would work with egg shaped balls.
That’s a great idea! Maybe with a simple flower shaped punch. That would be perfect for spring or Easter. :)
These are so pretty! Clever
Absolutely gorgeous!!! I think I can do this, don’t laugh, my crafty abilities tend to come and go (lol)!!!
Thanks so much for sharing!
Jane
This ornament is beautiful, as the same as all of your ornaments.
Thanks for sharing with all. Can’t wait to try it
Thank you, Denise!
These are so pretty! I will try then!
Great, thank you! :)
Wow that looks awesome! I’d so totally do that! I wonder what mulitute colors would look like…..
That sounds like a great idea to try out!
What a simple but stunning idea. Thank you for sharing.
Thank you so much!
Look fun to make! I will have to try.
What a neat idea for all ages!
Thanks so much for this great idea. Went shopping today for materials. Love this idea!
A perfect craft for my Ladies Bible Study !!! They are all over 65 and we always make cards etc. for special occasions. Beautiful!!
That’s wonderful!
Awesome! This is a great idea. I am occupational therapy student and I used this activity to run an arts and craft group treatment! Thank you!
That’s awesome!
Very pretty, thank you.
This is a great I dear would love to do it with the children plus myself.
Gemma x
You come up with some great ideas. I hope to be able to try some of them in the very near future.
Thank you for sharing your ideas.
You’re so welcome, and thank you for reading!
Can you tell me the size of the sequins and where you found this color? LOVE your ornaments – just bought patterns of others, too!
I don’t have the package anymore so I can’t remember the exact size, but I do remember that I bought this color at Michaels. I hope that helps! And thank you for purchasing some patterns, I hope you’ve enjoyed them! :)
[…] full tutorial for this wonderful craft can be found on The Ornament Girl‘s […]
Hi, I plan to order the no sew quilted Easter Egg book, but didn’t know if I would also need other tools. I do have some styrofoam falls, but will probably need to get some eggs. I would like to go shopping on Tuesday morning, so I wasn’t sure if I order the Easter Egg Book if it will be here right away and have a supply list or if it will take a while to send. It look like you were using some specific tools. I really enjoy or imagination and creativity. Do you do a news letter?
Hi Barb….Thank you for the compliment! The e-book will arrive immediately after you order, by email, so yup! You’ll have it right away. :) You will need the Styrofoam eggs, straight pins (or sequin pins), scissors, tape measure, and your fabrics.
And yes, I do have a newsletter, and I also have another no-sew pattern that you will get for free if you sign up….. you can do that right here: https://theornamentgirl.com/blog/get-my-moonlight-ornament-pattern-for-free/
Thank you again, Barb! :)
[…] source: […]
Hi Staci, I love your website and have downloaded a few patterns. I belong to a Homemaker Club (there are 11 in my county) and we all decorate a lodge in a State Park and the Park hosts an event known as Christmas Open House. People come from all over Eastern KY, So. Ohio and Western W.VA to stay at the park and admire the decorations and the entertainment. Each club decorates a tree and we are always looking for ornament ideas so you can see why I am so glad I found you. This year the theme is a Victorian Christmas so it you have any ideas I would be glad to buy any patterns you offer.
Wow, that sounds amazing! (Something I would sure love to visit!)
I am hoping to have a few new patterns and tutorials over the next couple of months. I hope I can come up with an idea worthy of your event. :)
This is lovely … and simple enough my grandson could do it with me. And so beautiful when done! I have paper punches that could personalize an ornament for almost anyone, so this will be a fun project!!! Thank you so much!
You’re welcome, I’m so glad you like the idea!
Those would look awesome with pearls too!
great idea!
love your ornaments… cant wait to try this..
thanks
debra
thank you, Debra! Have fun!
This looks like fun! Tell me though, I am still busily making quilted eggs – I didn’t know some sequins have larger holes! What do I need to look for so I can use the small pins?
Actually, I didn’t know that either! lol….. I bought most of my sequins at either Hobby Lobby or Michael’s, and I haven’t had any issues with the holes being too large. I’ve mostly only bought 7mm or smaller though…. I wonder if that has anything to do with it?
I’m sorry; I wish I could be more help!
What a great idea and fun at that.
Thank you Mary Ann!
You are so talented and have such great ideas!!!!
Thanks for sharing
Debbie
Thank you so much, Debbie!
Just love your ornaments! I have not made my first ornament yet, but am gathering supplies ! Of course I started looking for eggs when Easter is upon us and stock seems to be low ! Where do you find your pins- is there any place where you can buy them in bulk? I have found bags of sequin pins, but there are only 250 in a bag.
Hi Sandy…. The cheapest I’ve been able to get them so far has been from Walmart. Not exactly bulk, but it’s been about the best price I’ve found, and I pretty much clean them out every time I see them back in stock.
Online, you can find large packs of the sequin pins on Amazon. I have a link to those on this page: https://theornamentgirl.com/blog/quilted-ornament-supply-list/
Those are the shorter pins (some people prefer those over the longer ones), and they are pretty inexpensive.
I hope that helps!
These look perfect for my eight year old grandson to make for the family. Am anxious to get paper punches and Styrofoam balls so we can try it out. Thanks for the idea.
You are welcome! :)
Brilliant! It looks like fun. I will definitely add it to my crafts to do list. Thanks again.
Thanks, Marsha… have fun! :)
Thank you so much for sharing your beautiful work with us!!!!!
Thanks, Cathy! :)
Love this idea, shame we cant get Martha Stewart here in Portugal…but it has given me some inspiration for things I can make for the local animal charity christmas fair! Thank you for sharing, xxx
So glad it inspired you! Thanks so much! :)
[…] Tutorial via The Ornament Girl. […]
I love your ornaments, this one is so dainty I cannot wait to make this. I have decided to make each Grandchild an ornament for Christmas. Thank you for your wonderful ideas.
I’m so glad you like this idea, Joann, and I hope you enjoy making them. :)
I would love it if you put a print button on screen for pattern so it does not print the whole comment screen.It uses a lot of extra ink. Thanks,love you patterns
I love the simplicity of this ornament!! White on white with a little bling of colour.
Thanks, Linda!
I can’t wait till Christmas vacation starts for my Girls 16/14! We will definitely b making these!! Thank you for sharing LOVE all of yr beautiful ideas:) Merry Christmas xoxoxo
Awesome, Whitnee! I hope you all enjoy, and Merry Christmas to you, too!
Wow, those are so delicate! I absolutely love them! I make snowflakes as well but styrofoam ones. I also try to make them more 3D https://youtu.be/PvQwGxp-OWo
Love the look of the paper punch-out ornament. Could you spray glue after attaching the punch-outs
and then add the glitter after the ball is assembled?
Love this ornament! I can’t wait to run out and stock up on the materials needed to make some of these. Thank you for sharing.
This is absolutely gorgeous. I can’t wait to do this.
Beautiful!
Can’t wait to show my granddaughters
I was wondering if you could send me the directions for
the paper punch snowflake ornament. I cannot print it off the computer
and would love to make these with my granddaughters.
Thanks Gayle
[…] DIY Paper Punch Snowflake Christmas Ornaments. Instructions via theornamentgirl. […]
Thanks so much for sharing this. It is really pretty. I am going to make one as soon as I get the supplies!
Glad you like it, Donna! Have fun :)
It is the day after Thanksgiving so am on my way to deliver the Christmas Ornaments I have made thru the year to my grandkids so they have them to hang on their tree. I WILL stop by the store and purchase the “stamp” and start making these right away to add to next years ornaments. My FIRST ornament (Globe) should arrive in the next couple of weeks too. So excited. Thank you.
[…] Tutorial via The Ornament Girl. […]
[…] Adorn your Christmas tree with these easy-to-make snowflake ornaments using a paper punch! See the instructions via the ornament girl. […]
How hard would this be to do with 26 4th graders?
[…] theornamentgirl.com […]