
How to make a paper snowflake Christmas ornament | DIY
The other day my daughter was sitting on the floor of my office playing with a few of my paper punches and trying her best to use up all my paper, when an idea suddenly popped into my head for an ornament.
After playing around with a few ideas and wasting even more paper, I came to the conclusion that I had a really cute (and super cheap) homemade gift idea, or nifty little holiday decoration…and it's pretty ridiculously simple, too. I know it's a million degrees outside and Christmas is forever away, but well…I'll just play the “Christmas in July” card…and aside from that, it's never too early to start thinking about Christmas gifts, right?
No grumbling about how it's too early for Christmas. ChristmasChristmasChristmas! Okay, let's go!
Here's what you'll need:
- A Styrofoam ball. I used a 3″ size, but you could use any size you want.
- A paper punch with a cool shape, as long as it's relatively small; I would stick with an inch or less. For this ornament, I used a 1″ Martha Stewart snowflake punch. (Curse you, Martha Stewart craft section at Michaels…curse you).
- 2 sheets of white cardstock.
- Lots and lots of straight pins
- Lots and lots of sequins…I used aqua blue.
- Glitter (Thanks again, Martha..)
- About 6″ of ribbon to make the hanger
- And…nothing else. I'll just continue with this extra bullet point here so this ornament seems more intricate than it really is.
- Oh wait, there IS something else…glue, of course! (You know how some bartenders wear a bottle opener strapped to their arm? I wear glue like that).
First you'll need to punch out lots of little snowflakes (or whatever shape you are using). The number of punches will vary depending on the size of your punch and the size of your styrofoam ball…for my snowflake ornament, I probably used about 100 snowflakes. (I also doubled them up…see below). I used cardstock for this shape, because the edges of the snowflake were so flimsy, and I was afraid thinner paper would rip or bend easily…but a thinner (and less painful to punch out a million pieces of) paper would probably work perfectly fine for a more solid shape.

After I punched out all the little snowflakes and my hand cramps had subsided, I decided I wanted to sparkle them up a little bit with some white glitter…if you want to do this too, just spread them out on a newspaper, and lightly (lightly!) spray a tiny bit (a tiny bit!) of glue across them, and then sprinkle on the glitter. I sprayed a little too much on a few of the snowflakes, and those poor guys didn't make it. And so, just a teeny bit (a teeny bit!) will do the trick (the trick!).

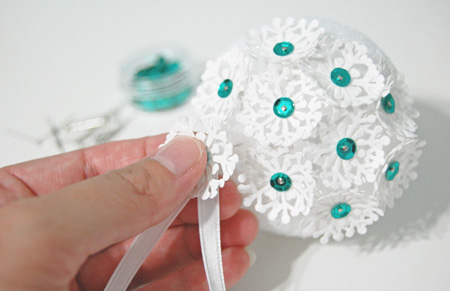
Finally time to start making the ornament…add a sequin to a pin, and then stick the pin through the centers of two snowflakes. I doubled up the snowflakes, unevenly, to make them look more full, but you may not need or want to do this with other shapes.

And then stick that one, and a whole bunch more, into the Styrofoam ball…easy peasy, snowflake squeezy.

At some point before your ball is covered, just put one of your snowflake-d pins through the ends of a loop of ribbon…

…and pin it down. (I like to add a little glue to the end of the pin before pushing it into the foam ball, for some added security).

And once the entire ball is covered…your ornament is done! How awesome and simple is that?!

These would look so cute on the Christmas tree…or a few grouped together in a bowl…just think of all the things you could do. Maybe some tiny beads instead of sequins…different colors and patterns and shapes of cardstock…
Or something a little dressier? A shimmery red and silver tablescape idea, perhaps?

Tell me what you think! Any other ways to vary this idea up?
P.S. Here's a pinnable!

Love it!!!!! thank you for sharing the tutorial with us!!! I am going to have to give this a try…I just love Christmas and all the unique decorations you can make!!!
Me too! So glad you like the tutorial, Marian! :)
Me too! So glad you like the tutorial, Marian! :)
Thanks for the compliment, Anne Marie, and you’re welcome!
These are beautiful. My friends are going to love these when I send them the link.
Thank you so much for sharing the link, Dawn!
This ornament is beautiful. You have been the inspiration for me to make ornaments. I really appreciate the tutorials you give us. However, I have found it looks easier than it really is!
Thank you for the compliment, Gloria! I am NEVER able to make things perfectly the first time…it usually takes me a few (or more!) tries before something comes out the way I want. However, this particular one really IS very simple, I promise! The most difficult part for me was punching all those snowflakes out. I wasn’t kidding about the cramps in my hand! :D
So glad you have enjoyed the tutorials! I love writing them…there will be more to come!
i love it!!! such a wonderful, creative idea. im going to use an egg shaped styrofoam ball & use pastel flowers punches for Easter! the wheels in my head are spinning a 100 mph’s with ideas…..ARGH! the possibilities are endless!
That is an awesome idea, Linda!
Beautiful and thanks soooo much for sharing!!!
Thank you, Peggy! :D
Love this! I am doing a Homemade in December Event and I need some more posts for my handmade orannemt week- I would love to feature you and share this post with my readers!Let me know if you are interested! mrsmichellebarbour@gmail.comHope to talk to you soon!Michellewww.delicateconstruction.com
Love these! They might have to be my ornament of the year!
So glad you like them, Angie!
We decided last year that we were going to do handmade gifts for Christmas this year…I can see so many different designs and colors for these. Oooh…and tablescapes and glass jars with confetti and the ornaments in them! I think I’ll have to make a Michaels and Hobby Lobby run tomorrow and start experimenting! Thank you so much for the darling ideas and the tutorials.
Have fun experimenting, Viktoria…and I would love to see photos of what you come up with! :)
I tweeted, Facebooked and Google+……
I think Jessica and I might try this. She would love it.
thanks, Tami!! :)
Thank you for the instructions for this beautiful ornament!
You are very welcome, Karen…I really love creating tutorials, and there are more to come :D
You did a very nice job explaining how to make the ornament and it is a beautiful idea.
Nice work on everything you do.
Thanks so much, Nancy!
These would be great for our 7th and 8 th graders to make for our school Christmas tree! Thanks for the information!
Awesome, Ginger…I bet they will be able to come up with some really creative ideas! :)
This would be a great idea for an “angel tree” … Put the gift lists attached with the ribbon, so the giver of the gifts also gets a gift (the ornament) to keep.
Great idea!
In the last picture of the red and the white sparkly ornaments…where did you get the sparkly balls? All I can find in Hobby Lobby and Michaels are the plain white! I bought different colors of card stock and even some glitter card stock and I’m going to see how those look. We have family in Louisiana and I’m going to make the bottom flake in gold, then a smaller flake on top out of paper with a fleur de lis on top…can’t wait to see how it turns out!
That sounds like it will be amazing, Viktoria! I am going to do a post in a few weeks to showcase all these awesome ideas… I hope you will send me some photos of yours when you are done!
For the glitter ones, I bought smooth white styrofoam balls (they sell them at Joann’s and Michaels) and glittered them myself. Just paint the ball with a paste-y kind of glue and then cover it with glitter. It takes a little while to dry, but once it does, you can seal the glitter with a clear sealer (or even Mod Podge…just make sure you put it in thinly).
Only hard part about using the smooth styrofoam, is it’s harder to push the pins in and really makes your fingers hurt after awhile. I have found it really helps to use the tiny sequin pins instead of regular straight pins.
Oh, and before I paint the ball with glue, I stick 4 pearl head pins into it to make a “stand” for it to dry on… Then I just pull them out after it has dried. :D
I love this idea. I am going to try to make one. I want to show to my StampinUp manager and mayy we can make some in a class. I have gotten several of your ornaments and love all of them. Thank you so much. Jackie
Thanks so much, Jackie :)
Loved the snowflake ornament. Can’t wait to make it with my cub scout pack.
I hope they love making them, Judy :D
Super cute! I am going to share with my preschool teachers. We all get into making a teacher tree for Christmas that is displayed in the front when parents walk in and I bet we will see many of these on our tree this year. Thanks so much for sharing!!! ~Debbie
You’re welcome, Debbie…have fun making them! :)
Beautiful ornament! Thanks for the tutorial. Liked it on Facebook.
Thank you, Judy! :)
Beautiful, just need the stamp and I can get creating. Thank you
You’re welcome, Melanie…have fun making them :)
These are awesome!! I’m gonna try and make these for Xmas gifts!!
Great idea, Dee!
Awesome!
:)
love them all ! such a great talent ..
Thank you, Magdalena :)
LOVE your ornaments! So very unique and would make a great addition to my contemporary trees!
I am jealous that you have more than one Christmas tree! :D
Staci,
These are so pretty and what a great project to do with my grandkids!
My daughter has made some using a flower punch and she loved it! Hope your grandkids enjoy!
…just awesome! Beautiful!
Thank you! :)
By the way I am new to this page bye
Love the ornament! Another great idea. Thanks for sharing
No problem, Janet…many more tutorials to come! :D
Oh last year I did pine cones, this year I am doing these.. This will make a great gift for my son to make for his teacher and grandparents!!
Great idea, Laura! :D
I love the ornament; so nice for a Christmas wonderland theme. This would be great for our ladies giveaway(where we try to do homemade if possible).
I tweeted
I liked on facebook
yourstrulee(at)sasktel(dot)net
Thanks so much, Robyn! :)
they are really very pretty…..thanks for the easy directions!
You’re welcome, Melody! :D
By the way I am new bye I am the one who sent u the other one but I forgot to do my name and email and website
your ornaments are wonderful, they scream christmas and in this heat wave that is welcoming. Maybe a sprinkle of diamond dust would bring out that icey look
Great idea, Carolyn…thanks! :)
Loved it! Great blogging by the way. Pictures are so helpful! Now I just need to be more crafty and actually make things!
Thanks, Miranda! Glad you like the post! :)
Why don’t u make a Christmas tree a mini one it will look great that’s what I think. Keep in touch email me at tinydestiny@hotmail.co.nz bye
liked the post on Facebook :)
great tutorial
I love this!!! And yes CURSE the Martha Stewart section at Micheals. I curse it everytime I go in there! What a pretty idea you have. oh and have you seen the all ready glittered stock paper? Just a thought for those of us who aren’t as talented as you! It would maybe save the be so careful with the glue and glitter. This is just for us ornament making for dummies followers! hahaha
That’s a great idea, Judy! :)
What a beautiful ornament, I am going to try and make this one,you always do such beautiful work and the pictures are great.
Thanks so much, Kim! Have fun making it! :)
I am so glad I stumbled upon your sight!!!! WOW these are amazing….you are trluy talented. I would buy ny of these if I saw them in a store or had any money to buy them :)
FABULOUS SISTER…….. FABULOUS!!!
Thank you so much, Amy!! :))
[…] worth :-)Blog of the week – christmas ornaments + home renovationChristmas Ornamentshow to make a snowflake christmas ornamentCufon.replace('#header p.tagline', { fontFamily: "journal" });Cufon.replace('#sidebar h5, […]
Love how pretty and simple this looks! I do have a question.. do you put glue on all the pins before you put them in the foam ball, or just the one holding the ribbon hanger? Ok.. one more question.. where is the best place to purchase the foam balls? They seem to be getting more and more expensive!
Thanks SO MUCH! :-)
Shauna, they ARE getting more expensive! I get mine at Walmart…they are the cheapest that I’ve been able to find. I will occasionally get them at Michael’s or JoAnn’s, but ONLY when I have coupons…their regular prices on styrofoam balls are absolutely ridiculous.
I used long pins when I made this particular ornament, so I didn’t use glue on each one, but if you use shorter sequin pins, or especially if you are pinning anything heavier than paper, you can definitely dip the end of the pin in a tiny bit of tacky glue before sticking it into the foam to give it a little more security. :)
Thank you SO much for the tips!! Your ornaments are always GORGEOUS!!
Thank you so much, Shauna! :D
OK I’m here…only a year late…OH MY GOODNESSSSSS!!!!! Can’t you see these in a bowl on the table at a wedding. use the wedding colors…bright colors would look like flowers!!! Soooo cute! Love your blog!!!
Thanks so much! And I agree with you! A bowl of these at a wedding would be adorable… a super inexpensive centerpiece idea! Thank you! :D
Sooooo pretty, and my TREE is white and turquoise! I have a snowflake punch and I love sequin…I’ve got to try this! So glad to find your site–you rock!! (I think I’ll have the ladies make these for my birthday Crafternoon on Nov. 29th!)
Oh my goodness, a “birthday crafternoon” sounds awesome! Hope you enjoyed making these!
It seems to me that you could buy snowflake confetti to do this if you didn’t want to cut out a million paper snowflakes. :)
That’s a great idea. :)
[…] Present Wreath 2) Snowflake Ornament 3) Twiggy Christmas Tree Ornament 4) Macaroni […]
Some of the MOST complete directions I have ever seen! You are good at this. thank you!
Hi,
Just found you and as soon as I can I WILL be ordering one of your tutorials. I have an ornament that I made several years ago and have always gotten compliments on it. It takes a lot of materials to make, but it can be made while watching T.V. in about a week (for me…ha ha). Anyway, I’d like to share the idea with you and perhaps someday you could try it out and maybe come up with ideas on how to make it easier. I could send it to you or try my hand at explaining it to you. Are you interested? P.S. I have no idea how to take a picture of it, but will try with my son, who is my “IT” guy. Thank you for all your beautiful and truly creative ideas.
Thanks for the great idea! I love this snowflake decoration – will make some for dear DIL who likes snowflakes…..you do nice work and are very creative! Hope mine measure up well to yours.
[…] pulled up the link to the blog titled How to Make a Snowflake Christmas Ornament and I fell in love with the little orb of paper snowflakes. Oh they are so awesome!! We […]
My friend and I made some of these today and I blogged about it. You can see it at: http://iamerica911.wordpress.com/2013/12/03/snowball-ornaments/
We loved making them! We found the project super easy and your tutorial is clear and thorough. Thanks so much!! : )
This ornament is just too cute!! I’ve been checking out all the amazing ornaments you have come up with & just wish I’d found them several months ago! But I still have time to make a few before this Christmas…and just can’t wait to get started!! Going to start on the Pledge Glitter balls today and since I have to go to Michael’s tomorrow anyway…I see a snowflake punch & these adorable ornaments in my near future!!
Hi I love the Christmas snowflake ornament thanks
The snowflake ornament is adorable and so easy. Love all of your ornaments, have the tutorials, and am making lots of them for Christmas. Thanks!
Love this, think I can do this! lol
Love this. Easy, peasy. So many different shapes you could use all year around. Thank you for sharing.