12 Weeks of Christmas Ornaments Challenge 2022 Week 1 FAQ

We usually get this question about the Basic Star Pattern, and I I wanted to make sure I addressed.. in case this was something you were wondering about, too.

The Basic Star Pattern calls for 2 fabrics.. but you said to use 3 fabrics in the Challenge. What am I supposed to do?

So, yes, the original Basic Star pattern (and the free workshop) calls for 2 fabrics, but you can actually use ANY number of different fabrics in this pattern... and for the Challenge, we are using 3.
In my Challenge ornament, my fabrics are:

  • Fabric 1: Cream Snowflakes
  • Fabric 2: Green Holly
  • Fabric 3: Red Floral

And, here is how I arranged them (for 3 layers):

  • Layer 1: Fabric 1 (like the original pattern)
  • Layer 2: Fabric 2 (like the original pattern)
  • Layer 3: Fabric 3 (replacing color 1 here)
  • No Layer 4
  • Band: Fabric 3

So, if you want to arrange your fabrics in the same way, the pieces you will need to cut for each color are:

  • Fabric 1: 8 - 2x3" rectangles
  • Fabric 2: 16 - 2x3" rectangles
  • Fabric 3: 16 - 2x3" rectangles + 2-1/2" x 10-1/2" band piece

Tanya did 4 layers. Her three fabrics are:

  • Fabric 1: White Solid
  • Fabric 2: Green Dots
  • Fabric 3: Red Dots

And, here is how she arranged them:

  • Layer 1: Fabric 1 (like the original pattern)
  • Layer 2: Fabric 2 (like the original pattern)
  • Layer 3: Fabric 1 again (like the original pattern)
  • Layer 4: Fabric 3 (replacing color 2 here)
  • Band: Fabric 1

So, if you want to arrange your fabrics in the same way, the pieces you will need to cut for each color are:

  • Fabric 1: 24 - 2x3" rectangles
  • Fabric 2: 16 - 2x3" rectangles
  • Fabric 3: 16 - 2x3" rectangles + 2-1/2" x 10-1/2" band piece

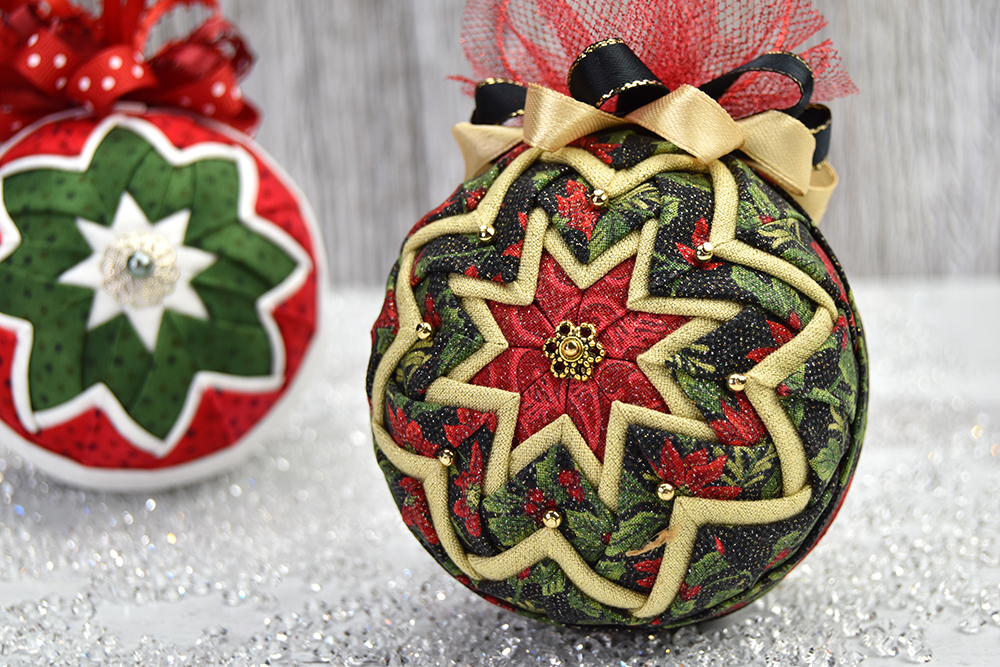
And, Darlene did 5 layers. Her fabrics are:

  • Fabric 1: Red Swirl
  • Fabric 2: Gold Glimmer
  • Fabric 3: Black Floral

And, here is how she arranged them:

  • Layer 1: Fabric 1 (like the original pattern)
  • Layer 2: Fabric 2 (like the original pattern)
  • Layer 3: Fabric 3 (replacing color 2 here)
  • Layer 4: Fabric 2
  • Layer 5: Fabric 3
  • Band: Fabric 3

So, if you want to arrange your fabrics in the same way, the pieces you will need to cut for each color are:

  • Fabric 1: 8 - 2x3" rectangles
  • Fabric 2: 32 - 2x3" rectangles
  • Fabric 3: 32 - 2x3" rectangles + 2-1/2" x 10-1/2" band piece

Remember.. the possibilities for these are endless, and that's what's making it so fun to see everyone's different ornaments for this Challenge. You can not only re-arrange the order of your fabrics, you can even add/take away layers! Please have fun creating your own unique ornament design!

(If you don't yet know this pattern, you can register for the free videos, right HERE.)

Your turn!

Your challenge is.... to make your own Basic Star Ornament using your 3 chosen fabrics.... you can arrange your fabrics like I have above, or better yet, mix it up!

Remember, if you don't know how to make the Basic Star, you can learn it for free right HERE.

Then, show me what you've got by posting it on Instagram using the hashtag #OrnamentGirlsChallenge so we can all see it!

(And, if you're an Ornament Girls Club Member, please post it in our private FB group!)

I'll see ya in a week, with Challenge Pattern #2.

Happy Ornament-ing!

Staci Ann

p.s. If you bought your foam ahead of time based on the Supply List I gave you, this week uses an 8-Lined Ball. But, don't worry if you don't have a pre-lined ball... this one can either be done without lines, or you can draw your own.)

13 Comments

  1. Elaine Friece on September 26, 2022 at 1:24 pm

    Thank you. It does help. However, I’m going to be traveling and your ebooks always give wonderful tips and tricks. I have made the basic star before and reviewed the video again this past weekend. I’ll be starting it tomorrow and fabric is already cut.

    Elaine

  2. Melinda on September 26, 2022 at 3:05 pm

    This is very helpful! I have watched your videos. They are so good. I am waiting on my foam to come. Nothing like waiting till the last minute, right! Now I’m glad I didn’t have it. I have more inspiration and a better understanding of my choices. Thanks!

  3. Susan Mills on September 26, 2022 at 3:53 pm

    Where do you find the buttons you use on ends?

    • Sarah Cinocco on September 27, 2022 at 5:00 pm

      Hi Susan, which ornament are you looking at? I’m happy to check into the embellishments for you :)

  4. Susan Mills on September 26, 2022 at 4:01 pm

    I have started marking end of foam the color of fabric I use there. If it is white that is ok. If red or green I mark x with marker so white ball doesn’t show when using those colors.

  5. Robin Ownby on September 27, 2022 at 9:59 am

    I love Darlene’s fabric and was wondering who the manufacture was?

    • Sarah Cinocco on September 27, 2022 at 12:10 pm

      Hi Robin, Darlene used Moda’s Sparkle and Shine fabric. It is so beautiful!

  6. Mary Lynn on September 27, 2022 at 11:49 pm

    Will you also give us the manufacturer of Tanya’s fabric please?

    • Sarah Cinocco on September 28, 2022 at 11:47 am

      Hi Mary,
      Tanya’s fabrics are all from Westrade Textiles:

      Multi Spot Blender – Fuchsia
      R17030-3
      Multi Spot Blender – Green
      R17030-4
      Tone on Tone Blender – White
      R17054-01

  7. Carol Trammell on October 1, 2022 at 3:34 pm

    Love the little poinsettia in the center of Staci’s ornament! Resource?

    • Sarah Cinocco on October 2, 2022 at 11:28 am

      Hi Carol, the little poinsettia on Staci Ann’s ornament came from the scrapbooking embellishments section. She thinks she got it at Hobby Lobby.

      • Anonymous on October 3, 2022 at 1:01 pm

        Thank you Sarah

  8. Crystal on October 14, 2022 at 3:28 pm

    I love how you showed the variations of the basic star, the how to arrange the fabrics if you want to try a different way, and my favorite part how much of each fabric to cut. I would absolutely love it if you all could do something like this for all 12 ornaments as it would help our new OGs! Thank you all for the awesome job you do!

Leave a Comment