
Handmade braided trim Christmas ornament | DIY
I just got back from vacation in Costa Rica, which was absolutely awesome, but my mind never completely escaped Christmas. It didn't help that even the resort was all decked out in Christmas decorations. (You should have heard my squeals of delight when I saw lighted reindeer surrounding the pools….EEEEEE!)

a rare and elusive Costa Rican reindeer
So, with Christmas inspiration even on a beach, I had an idea for December. I am going to attempt to do a 12 Days of Christmas (ornaments!) blog project…12 posts of handmade ornament DIY's. This is going to be tough, because these things can get really time consuming, but I'm going to try my very best. I am positive that I will not be able to manage these 12 days to be all in a row…but still, I will try to do them all before Dec 24th.
So…it's December 1st… the perfect day to start!
And today, I have something really simple: an ornament wrapped in braided trim. So easy to do, but such pretty results:

What you'll need:
- a styrofoam ball (I used a 3″ ball)
- a pretty trim. The candy swirled trim I used for my ornament turned out awesome. Here is one I found that looks similar to the one I used. But then again, a solid color, like gold or silver, would be incredibly elegant! (Okay…future blog post idea.) The amount you will need depends on the size of the ball and the size of the trim…for my ornament, I used 1/8″ trim and it took just under 10 yards to cover the ball.
- clear glue. My favorite craft glue is Beacon's 3-in-1 Advanced Craft Glue. It grabs quickly, and dries perfectly clear and permanent. (Just don't wipe your glued up fingertips across your jeans like my spacey self keeps doing, because when I say permanent, I mean nothing seems to be able to take this stuff out.)
- a couple of pretty beads for the top and bottom of the ornament.
- a couple of straight pins
- some ribbon for the hanger and embellishments


Add glue here and there as you go to secure the trim.

If you do not have a continuous piece of trim, no worries…just make sure the end is glued securely, and start with a new piece. It will be hard to see where the pieces start and end once the ball is covered entirely.

It took me a good 25 minutes to wrap this…when you get to the other end, be sure to use a generous amount of glue so that the trim will stay put:

And go until the whole thing is covered:

Honestly, it looks really cool just like it is now. Wouldn't a few of these grouped together make awesome bowl fillers?
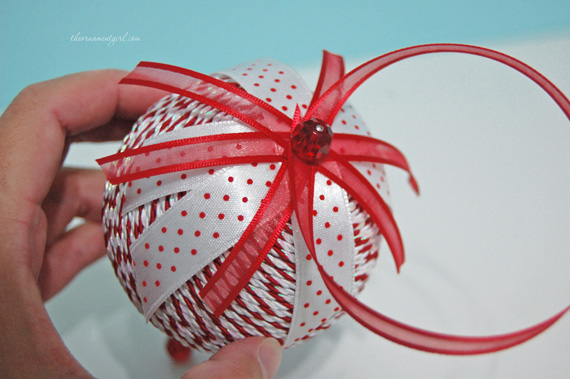
But I wanted to make it into an ornament, so I cut a few pieces of coordinating ribbons into varying lengths, between about 3 to 4 inches each, angling the edges:

I also used an 8″ piece of ribbon for a hanger. Just thread a second bead onto a pin, and form a loop with your hanger ribbon right after the bead:

Then pin right through the centers of each of your pieces of ribbon:

Put some glue where your trim ended:

…and stick in your hanger.

A little dab of glue right under the bead doesn't hurt either:

All done!

Isn't that so easy and cute?
Ooooooo! I find this idea very intriguing. I can’t wait to see the next creation. You have a wonderful gift and know you are up to the challenge!
Thank you so much! :)
Oh now that’s just too cute. I think I will be making a run to my local craft supply store after work tonight! Thanks for this tutorial!
Awesome! And you’re welcome!
Beautiful! Thanks for a great tutorial!
You’re welcome! :)
Really cute! I’ve used to do something similiar using the string of pearls. Who carries the Beacon glue that u mentioned??? I love ur ornaments, gorgeous. Thanks for the many ideas.
Thanks, Diana! I had seen some wrapped beaded ornaments and that is what made me think of using the trim this way. :)
I know for sure that JoAnn’s carries the glue, but I think they probably have it at Michael’s and Hobby Lobby as well.
Thank you. Checked both Michaels today nothing but thank goodness Joann’s had it and I almost missed it. I live in Sarasota, do u all have the hobby lobby in Orlando??? Have a great weekend.
Glad you found it! There is a Hobby Lobby in Orlando, but I am a good hour away from it, and have only been there once. But I loved it, and am hoping to get there at least once before Christmas!
You have a great weekend, too! :)
I really can’t wait to try this . All of your ornaments are beautiful! !
I’m on vacation, so I’ll try it when I get home.
I really can’t wait to try this . All of your ornaments are beautiful! !
I’m on vacation, so I’ll try it when I get home.
Love this ornament – cannot wait to give it a try. Thanks for sharing – will be looking forward to the ones to come.
You’re welcome, Anne Marie!
I love this ornament! I will definitely be making a few of these for my tree. Thanks for the tutorial and pictures. Merry Christmas!
You’re welcome Nancy, and Merry Christmas to you too! :)
You rule the handmade ornament world! I LOVE your stuff and always look forward to checking out your website and seeing what’s in store! I love this tutorial, it’s easy enough for my 11 year old daughter to do. Thank you for giving us a craft to do together…special Christmas memories will be made, thanks to you!
You rock, Ornament Girl!
Awww, thanks, Sherry! :D
These are really awesome ornaments.May I gift to my girlfriend?
You are very creative! I’m backreading your posts and I totally love all your ornaments..
Thank you! :D
OMG! That is genius! And I love the styrofoam ball idea. No breakage!! I have been working with glass and it’s touch and go. And your ornament looks less time consuming with fabulous results. I love it, thanks for sharing!
You’re welcome! :D
Hi, I’m sad that I found this too late to use for this Christmas, but now I’ll have a jump start on ideas for next year. Can you please share where you got your trim? I love the red and white. Kind of looks like baker’s twine but thicker. I’d love to get some, but don’t remember seeing anything similar. Thanks for the tutorial and thanks for sharing.
You’re welcome, Kathy! I got the trim at Michael’s…they have it right next to all of the Christmas ribbon. They might still have some left, and if so, it will all be super cheap…hopefully you can find some before it’s gone!
If you can’t find it at Michael’s, I just remembered…they do have a few Christmas trims at JoAnn’s that are available year round…it is sold by the yard. They don’t have a huge selection, but they do have a few. :)
[…] Favorite Christmas OrnamentsMake This Christmas Glimmer with Christmas Ornaments and Lightshandmade braided trim christmas ornamentCufon.replace('#header p.tagline', { fontFamily: "journal" });Cufon.replace('#sidebar h5, […]
It’s not exactly the right time of year, but I’ll definitely be bookmarking this page for next Christmas. Not made my own decorations since I was a kid, but I think that’s about to change. :)
Absolutely adorable! Reminds me of my younger days making ornaments. I will make a bunch of these for my tree and gifts!
love this ornament and i have made several of your ornaments and i love everyone
I put in for your news letter. I hope to receive it.
What a wonderful idea! thank you for sharing!
[…] Navidad para nuestro árbol. ¡La elección del rojo y el blanco ha sido todo un acierto!. (Vía: The Ornament Girl – Traducción en […]
I really like this ornament !, wouldn’t it be cute if you made smaller ones for little trees or even bunch them together ..thank you for sharing :)
I love your ornaments. They are just beautiful. I wanted to make this one for my daughter but couldn’t find the same trim you used. Where would I be able to find it. Looked in all the craft stores and Joann’s
Do you have any ideas for clear ornaments? I love this one and I’m gonna do it too. But I bought some clear ones and looking for some ideas.
Love this one. Gr8 for ladies gift
Very cool! I can see it done up in other colors too! Thanks!
I Still have not get my two pattern One was theFabric pine cone ornament the other was Rockin Around the Christmas Tree Ornament. Been looking at my E mail. and have not seen it there. they are payfor. Thank You,Barbara
Hi Barbara…. I am so sorry that you still did not receive them… I am wondering if there is a spam filter or something that is blocking my emails, because of the attached pattern files. I am going to try and re-send them right now. Will you let me know if you still don’t see them in your email? Again, I truly apologize!
what a great idea and the tutorial is great thanks
Awesome – I have defintely got to try this one! Love your stuff!
Your ideas are always awesome, Thanks! I am working the braided trim Christmas Ornament.
Your ideas are always awesome, Thanks! I am working the braided trim Christmas Ornament.
Sherry, I left mine on because it was pretty, but depending on the trim/colors/ design, I think you could do whatever you think looks best once it’s completely dry and in place. :)
I love the new braid ornament. I will try this one. Let you know how it comes out.
Yes, please let us know!
Wondering if this would work with a string of small beads or small pearls, or would that be too heavy to glue? It would be elegant. Thanks for sharing your tutorial!! You, girl, are a peach!!
Thank you, Kayse! Great idea….I think pearls would be gorgeous; they have strands of pearls in the “trims” section at JoAnns that are very lightweight….I bet those would work wonderfully. Thank you for the idea!
I am so thankful I found you! Not only do you make it super easy to do, your color combos are fantastic! I’m learning so much from you!
That makes my day! Thank you so much, Mary! :)
You are so talented. So easy but looks great. Love your ornaments. I will definitely be making some of these ornaments and some of your other ornaments. I am so glad I found you on the web. Thanks for the free instructions.
Thank you Dora! I hope you enjoy making these. :)
How do i copy the pattern only & not all of the other stuff as i
don,t want all of the other stuff , just the pattern
Pearl Livengood
You have to purchase her ornamental tutorials, they all come in instructions of ornamental ball decorations. Because everything is in pictures and written instructions… if u dont want to purchase, she has a freebie. Which is a blue ornamental at top of website. This will show u everything and go from there. And sign up for newsletter, she sends some execllent tips etc… these are relatively easy! When u save newsletter and freebies, u can print these out and save them. These do not come in patterns. Pictures and instructions go together as very detailed.
Oh! And Don’t you know I have both those Items in my Stash! WHOOP WHOOP! Here I go! Friday night and nothing to do!
Love it!Cannot wait to make some!
Each one I see is prettier and prettier. You do a wonderful job and it shows. Enjoy them much.
thank you so much! I’m so glad you’re enjoying them. :)
Nice idea to make an ornament! we’ve done this in the past with egg shape styrofoam “balls” and use them as Easter decorations. also instead of this type of trim it works really well with cotton crochet yarn. Fun, fun, fun! !!
Great ideas! :)
I can see who is having these for xmas along with a candle on a mat with some acorn thingys. Fabulous and easy
Thank you
Love the look of this ornament! And the bowl filler idea is great! What size/kind of bead do you use, and where do you find them? I look for beads, but the larger ones have holes that are too large for the pin.
Thanks!
Hi Vicki….. I’m glad you like the idea! I can’t remember the size of this bead I used, but something you can do if the hole is too big in a bead you want to use, is to use another smaller bead, or even a sequin, between the bead and the head of the pin. :)
That’s a great idea! I do like the look of a slightly larger bead though! I’ve thought of maybe using a corsage pin too! :)
I love all your ornaments! You are an inspiration! Thanks so much for sharing your beautiful creations!
Thank you so much! :)
Love it…thank you
Thanks so much Gracie!
I just made these today and they are beautiful! They are so pretty that it is hard to believe how easy they are to make!
I’m so glad you made them and love them!! Thank you, Sylvia! :)
Absolutely stunning. So easy.
So glad you like the idea! :)
Absolutely beautiful!!!
Thank you! :)
Wondering did you put the glue all the way to the end??? To start used the red bean and end of the twine still put another red bean??
I made some of these “accidentally.” I had the trim and a Styrofoam egg, and just started wrapping. They really are cute. Love your beaded pin idea. I bought pins with colored heads and used those, but your bead is so much prettier. I wonder if I have any of the trim left to make more!?!
I love it! Thank You for such great instructions and sharing
Just love all your idea’s. Can’t wait to be in your club. Have a great day!
Thank you for the pattern. I picked up some trim at WalMart that was on sale so I’m going to try this one. Still disappointed that I couldn’t get your $17 special at Christmas time. Enjoy your day…Barbara
I’ve got trim!! I will make this tomorrow!!!!
After making the quilted ball which turned out great, I showed our craft club how to make one and the result was outstanding, so now we will be making this one which looks beautiful. Keep your ideas coming the ladies at our church craft club can’t get enough of your beautiful baubles God Bless x