
Handmade braided trim Christmas ornament | DIY
I just got back from vacation in Costa Rica, which was absolutely awesome, but my mind never completely escaped Christmas. It didn't help that even the resort was all decked out in Christmas decorations. (You should have heard my squeals of delight when I saw lighted reindeer surrounding the pools….EEEEEE!)

a rare and elusive Costa Rican reindeer
So, with Christmas inspiration even on a beach, I had an idea for December. I am going to attempt to do a 12 Days of Christmas (ornaments!) blog project…12 posts of handmade ornament DIY's. This is going to be tough, because these things can get really time consuming, but I'm going to try my very best. I am positive that I will not be able to manage these 12 days to be all in a row…but still, I will try to do them all before Dec 24th.
So…it's December 1st… the perfect day to start!
And today, I have something really simple: an ornament wrapped in braided trim. So easy to do, but such pretty results:

What you'll need:
- a styrofoam ball (I used a 3″ ball)
- a pretty trim. The candy swirled trim I used for my ornament turned out awesome. Here is one I found that looks similar to the one I used. But then again, a solid color, like gold or silver, would be incredibly elegant! (Okay…future blog post idea.) The amount you will need depends on the size of the ball and the size of the trim…for my ornament, I used 1/8″ trim and it took just under 10 yards to cover the ball.
- clear glue. My favorite craft glue is Beacon's 3-in-1 Advanced Craft Glue. It grabs quickly, and dries perfectly clear and permanent. (Just don't wipe your glued up fingertips across your jeans like my spacey self keeps doing, because when I say permanent, I mean nothing seems to be able to take this stuff out.)
- a couple of pretty beads for the top and bottom of the ornament.
- a couple of straight pins
- some ribbon for the hanger and embellishments


Add glue here and there as you go to secure the trim.

If you do not have a continuous piece of trim, no worries…just make sure the end is glued securely, and start with a new piece. It will be hard to see where the pieces start and end once the ball is covered entirely.

It took me a good 25 minutes to wrap this…when you get to the other end, be sure to use a generous amount of glue so that the trim will stay put:

And go until the whole thing is covered:

Honestly, it looks really cool just like it is now. Wouldn't a few of these grouped together make awesome bowl fillers?
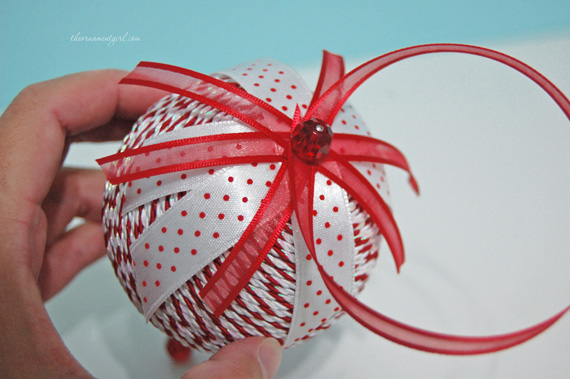
But I wanted to make it into an ornament, so I cut a few pieces of coordinating ribbons into varying lengths, between about 3 to 4 inches each, angling the edges:

I also used an 8″ piece of ribbon for a hanger. Just thread a second bead onto a pin, and form a loop with your hanger ribbon right after the bead:

Then pin right through the centers of each of your pieces of ribbon:

Put some glue where your trim ended:

…and stick in your hanger.

A little dab of glue right under the bead doesn't hurt either:

All done!

Isn't that so easy and cute?
That is so pretty and easy, I’ve been doing strictly fabric ones and this will make a nice change. I think I could get hooked on these.
You are Amazing !!! I totally love this !!!
Amei seu trabalho… muito lindo ?
I love this one! Thank you :)
I am getting mixed messages from your supply list. You say you use the rough balls for the quilted ornaments, and then you say the Dremmel knife cuts the smooth ornaments like butter. Well, we tried it and it didn’t work like you said. Aren’t the ones you cut with a knife the quilted ornaments? I have made some and use the smooth ball, now I am reading you use the rough ball for the quilted ornaments…very confusing, or is it me? Please, I love doing this stuff and want to get it right.
Want to thank you for my first free ornament pattern and complete tutorial. No, I haven’t made it yet but I’m looking forward to it as soon as I can go get supplies. Your tutorial was outstanding in that it was completely detailed step by step, which I need , being 85 years old, I need to SEE it being made. Love all your patterns , and appreciate your sharing these lovely patterns and knowledge. Sincerely, Bernice (“Bunny”).
Twenty years younger, but I agree with all you said! I am thinking this idea for the whole years for giving gifts, different colors, definately very versatile!
Adorable. I shall make several of these. Thank you.
That so perrty!!!!
Love these ornaments, just beautiful. Thank you also for the wonderful instructions.
I love all your ornaments!! This ribbon one looks really cool. Just wish I could get all mine made in a timely manner! I also am a quilter; so it’s hard to devote enough time to both!
I going to try to make them I love the way they look
I love the look of the ornaments I think I’ll make some
Thanks so much! I hope you love making them.
Il est dommage que vous n’envoyez pas les fournitures vers le Portugal (ce que je ne comprends pas car vous faites les envois vers l’Espagne et la France)
These are so pretty and easy to make. I make something different each year and these are my favorite. Whimsical, fun and chic is what they are. Thank you for your creativity.
So fun! I bet yours are beautiful! Happy ornamenting.
I will be making at least 1 of these and possibly more. They look so easy. I could easily make SEVERAL watching a Hallmark Christmas Movie.
What a lovely way to enjoy your time!