
How to make rag ball Christmas ornaments | DIY

I could barely wait to write a tutorial about the ornaments I just made today. I've seen rag ball bowl fillers before, but I've never tried making one into an ornament until now.
I finally gave it a shot today, and I am so excited about how they turned out THATICANBARELYSTANDIT.
I think it's because not only are they cute, but they were so easy, and they are a totally perfect way to use up your extra fabric that is otherwise possibly building up in baskets and shoe boxes and behind couch pillows, slowly and methodically taking over your house.
Here's what I used to make mine:
- a 3″ smooth styrofoam ball
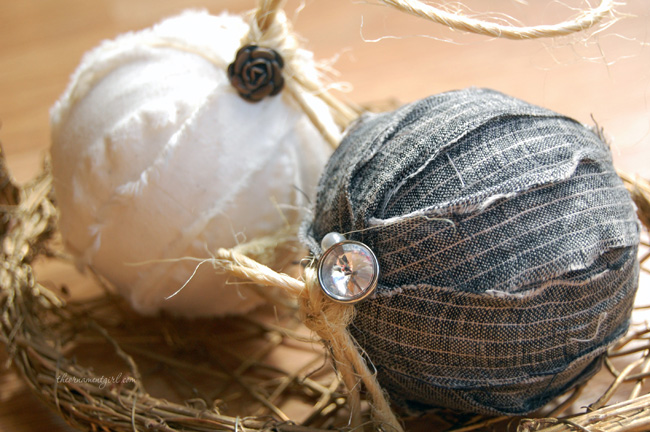
- fabric – I used a natural muslin fabric for one of my ornaments, and a pin-striped linen for the other.
- craft glue or hot glue
- scissors
- U Pin (you can find these in the floral aisle at craft stores or even at Walmart, or online, right HERE).
- twine
- anything else you'd like to embellish them with…I've been on a button kick for the last few days, so I went with that.
At the end of your fabric, make several small cuts about an inch apart from each other. Cut into the side of the fabric that is going with the grain.

Now, tear the fabric the rest of the way into strips. You want about 8 strips, 11 or 12″ long.

Tearing it instead of cutting it will bunch up the fabric just a teeny bit, and give you this awesome raw edge:

Now just glue a strip around the ball, cutting off any excess where the ends meet.

And then glue a second piece opposite the first:

Continue doing this until your ball is covered, except for your last strip. (And don't worry about everything being just right…the beauty of this ornament is in the imperfections.) Before gluing on the last piece of fabric, create a loop with a piece of twine, and pin it down with the floral pin, so the loop is on one side, and the ends are on the other, like this:

Now glue down your last fabric strip, so that the ends cover the twine where it is pinned:

Then wrap the ends of the twine around the bottom of the loop once or twice, and tie a knot:

Originally this was all I was going to do. But I wanted to make them a little less “country” and a little more “shabby”, so I glued on a button…and I thought the metal would look awesome in contrast with the natural texture of the fabric. And it does!

And then I made a second one. This is dress apparel linen…how cool is that? I also added a pearl tipped pin and a shiny mirrored button.

You can almost see my horrible orange snoopy shirt in the reflection of that button. I should maybe think about using my dress apparel linen to make…apparel…instead of ornaments…maybe.
So what do you think of these?
Glitz, glamour and even cutesy are words I associate with the colorful baubles of this Season. Yet, the simple country charm of these creations are inviting. Looking forward to the next design.
Merry Christmas!
Merry Christmas to you, too!
These are so dang CUTE!! thank you!
I did a little happy dance in my chair! I love those ornaments!!! Thank you so much for sharing!
You are welcome! :)
Sooooo cute. I think I will try this. Thank you and Merry Christmas ? ?
Thank you, Laura! Merry Christmas to you too.
Love it! It certainly helps us less creatively crafty girls the chance to let people think we know what were doing when we follow one of your simple DIY’s.
Thank you! So glad you like the DIY’s!
love the idea I have a log home and lots of thoughts but you helped me with another thought instead of button tiny pinecone and berry
That’s a great idea. :)
[…] DIY Ornament tutorial is from a blog called The Ornament Girl’s Blog. These are called Rag Ball Christmas Ornaments. I’ve always loved the vintage look and I love handmade, so this tutorial totally fits the […]
FINALLY – a way to use my old (OLD) styrofoam satin string ornaments!!! I can’t wait to give this a try . . . . Great idea!
Awesome! Have fun making them!
I love all of your ideas and cant wait to try some myself!!-Excited- I love ornaments anyway but some of these u have could be left to hang somewhere all year long. Thanks so much for sharing!!
[…] ver tutorial […]
[…] https://theornamentgirl.com/blog/being-crafty/twelve-days-of-christmas-ornaments-day-4/ […]
Hi, these are adorable and I will be making these for an annual ornament exchange I participate in :) I am NOT crafty but I think I can handle this with ease! How much fabric per ornament? I will probably make 20 and use 1-4 diff fabrice (I will let my daughter make some :))
THANK YOU
I like the rag ball and I am going to make
one to see how it turns out. I will post when I’m done, know promises on how it will turn out StaciAnn we’ll just have to wait and see.
[…] dit idee vond ik via de leuke Nederlandse kerstsite Christmaholic. De foto hierboven komt van The Ornament Girl, in het artikel vind je een stap voor stap uitleg hoe je de ballen kan maken. Je kan met piepschuim […]
[…] an elegant ornament from strips of scrap fabrics and a few special buttons. Find the Rag Ball Christmas Ornaments tutorial from The Ornament […]
[…] Simple and inexpensive, these rag ball ornaments can be modified to suit any color scheme. – source […]
I really like this article. thank for your great infomation. Beside , I want to
recommend my service to give an opportunities to invest a apartment: the golden palmI really like this article.
thank for your great in infomation. Beside , I want to recommend my service to give an opportunities
to invest a apartment: the golden palm
I’ll make this…. I really like it. sew pretty.
WOW Staci Ann these Rag Ornaments are Amazing. I Love them so because I’ve been making Rag Quilts for 20 years (with the help of my husband) and never would of thought to make matching Ornaments. What a GREAT idea. Thank you so very much for sharing all your Wonderful ideas. You are a Blessing to Me and I’m sure so many others.
God Bless you my Dear
love this idea and am going to try it with some sashay yarn that i have. it is in colors with silver threads and want to see how it works.
[…] Therefore, they are aptly called Rag Ball Christmas Ornaments. […]