
Handmade Ribbon Wrapped Christmas Ornament Ball | DIY
Today I am going to teach you a little known fact about Christmas that I'll bet you've never heard before. The seven swans-a-swimming and the eight maids-a-milking were actually all given by my true love (and your true love, too) on the same day. It turns out that our true love liked to wait 'til the last minute. Which is SUCH a coincidence, because I just happen to be doing my Twelve Days of Christmas Ornaments Day 7 and Day 8 DIY's on the same day, too.
My last few ornament DIY's have been more non-traditional colors and style, so today I wanted to make one that was totally Christmas-y. :)
This one is simple, too. And, it's a great way to use up some leftover Christmas ribbon that you might have.
You'll need:
- A smooth styrofoam ball (I used a 3″)
- Narrow ribbon. I used a little more than one 9 ft roll of 3/8″ wide ribbon. That is about as wide as I would go for a 3″ ball…any wider, and it won't lay as flat on the ball. I also used a foot and a half or so of another ribbon to decorate the middle of the ornament, and for the hanger.
- Craft glue
- Fine sandpaper
- Some sequins, seed beads, and a pearl head pin
If the styrofoam ball has a bumpy “equator” around the circumference, sand it down lightly so that it's smooth.

Starting at one of the “poles”, draw a thin line with your glue to the opposite side of the ball. Don't worry if it's not perfect; you will be covering the whole ball anyway.

Then, lay your ribbon on the glue, making sure it's smooth and straight.

Do the same to bring it back up around the ball to where you began:

Now bring the ribbon down right beside your first line, just slightly overlapping the edges of the ribbon that is already glued down. (Put some glue on the ball first.)

Cross over the first line of ribbon at the bottom of the ornament, before bringing the ribbon back up to the top:

Continue doing this, working your way around the whole ball:

When the ball is covered, glue the end of the ribbon securely at the top of the ball (so that you can cover the raw edge with the hanger).

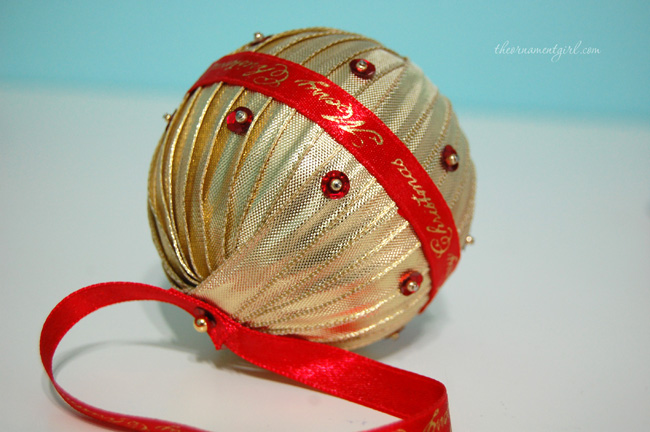
Put a little glue on the back of a piece of coordinating ribbon, and glue that around the center of the ornament:

Make a hanger by creating a loop with another piece of ribbon, and pinning it to the top of the ornament with the pearl head pin and a sequin:

Just to dress it up a little more, I added some gold seed beads and red sequins to straight pins…

And pinned them around the ornament just above and below the red ribbon:

All done! Simple and quick, but very festive.

There are a thousand possiblities with this one. I could use up some old ribbon and have to go out and buy new ones! LOL! Thanks for the step by step instructions.
You’re welcome! Yes, this is a GREAT way to use up old ribbon…and an even BETTER excuse to buy more. (as if an excuse is needed!) ;D
Thank you so much will try this soon. I love all your work your very talented ?
My mom has a vintage kissing ball that is similar with mistletoe attached at the bottom…I am going to attempt to do the same with this ‘ornament’!
[…] The Wrapped Ribbon Ornament tutorial (used to make the 'ears') can be found HERE. […]
Love all your ornaments. Just bought the rosebud pattern e-book I have made over 100 ornaments and try to create a difference in each one. I am looking forward to trying the rosebud
Itching to try it! Have to get some more ribbon for the project.
Thanks for the great instructions.
I think it is beautiful and I can’t wait to try it sorry so late just now opened my emails
This is so pretty and easy looking to do. Do I need to try this out.
Thank you Staci
Me encanta, es preciosa y fácil de hacer, muchas gracias por enseñar tus diseños
hoe do you wrap the ribbon around the smaller 1 1/2 inch ball and make it look nice and avoid so much glue residue
Hi Sheila, you will probably want to use narrow ribbon, maybe as narrow as 1/8″ since you are working with a smaller ball. You can also use less glue by gluing down a starting point, wrapping a bit and then adding a little more glue at various spots to help hold things in place. I hope that helps get you started! Happy Ornament-ing!
Can you tell me how to put the glue on without getting it all over me? Each stand has glue right
Hi Sheila, using a small amount of glue, or spreading with a paintbrush might help keep the glue off your hands. I hope that helps!
Beautiful work. Thank you for sharing. My question is what kind of glue do you use? Can I use any glue or does it have to be special glue for fabric?
Hi Rosemary, we like Beacon’s 3 in 1 for a lot of our ornament-ing projects.
Any tips for using this technique on a hemi?
Hi Adela, what a neat idea! We haven’t tried this technique on a hemi before. If you are hoping to add a fussy cut to the flat side, maybe you could do that after you have wrapped the foam with the ribbon. You might also find that the Trinity Knot pattern with ribbon will still give you the look you’re going for, but the option to keep the flat side blank for a fussy cut.