
Upcycled craft storage from tin cans…

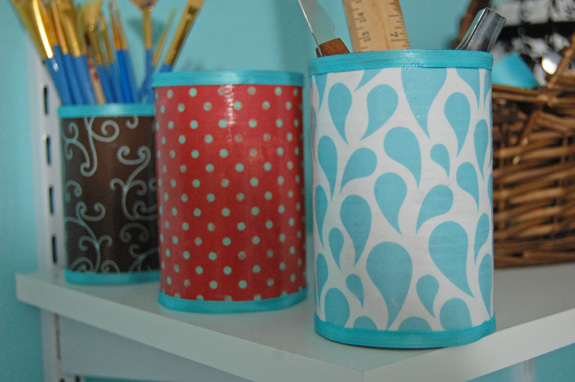
upcycled soup cans
One of the challenges I’ve had as I’ve been renovating my craft room over the last couple of months has been finding (cheap) ways to store all the little odds and ends that always end up strewn all over my workspace. At some point a few weeks back, I was rinsing out a can to throw in the recycle bin, when it hit me that I was getting ready to toss out a perfectly fantastic (and already paid for!) storage container. All it needed was a little love. So, I started saving lots of cans. I even finally dumped out the gross popcorn from the big $5 tin that my kids convince me to buy every Christmas but we never actually eat.
Enter here, my entirely unhealthy obsession with Mod Podge. (cue up the angel choir!) This stuff is awesome.

I did go and buy a few sheets of scrapbooking paper. I don’t actually scrapbook, but I have to admit, it’s hard not to notice all that colorful stuff when I go craft shopping. (It takes up about half the store, after all). All I’d needed was an excuse.
These turned out really great though, I must admit, and even the little soup can size holds a good amount of supplies. Plus, I made them to match the new color scheme of the room. Here’s the stuff you’ll need if you’d like to make some:
- Some pretty paper. I found that the thicker of the scrapbooking papers worked best, but I wouldn’t go cardstock thick.
- Decoupage glue/sealer (I’ve used a few different kinds, but Mod Podge is my favorite)
- Ribbon or any other embellishments you might like.
- Ruler, scissors, pencil
- Some cans.
The coffee can size is great…it holds LOTS!

I wish I could say that the store was out of Starbucks that day, but nope…I’m thrifty.
First, take off any paper, and measure the height of the can, and then your paper. I wouldn’t recommend trying to skip over this part like I did the first three times. It’s amazing how off you can be, even when you’re positive you’ve got mad eyeballing skills. I used the measurement between, and not including, the lip of the can at the top and bottom. I found that the paper lay much smoother this way.

(and by the way, no, that is certainly NOT my chippingoffnailpolish-horriblyinneedofamanicure hand. It’s…someone else’s. Ahem.)
Paint a layer of glue onto the can. I went a little heavy with this layer, especially for the thicker papers. Plus…it’s just really fun, gosh darn it.

mod podge the can
Apply your paper:

When you’ve got the paper in place, start at one end and make sure to press it down tightly all the way around the can, working out any ripples to get it laying nice and smoothly. Once the glue dries (and it does dry pretty quickly) you won’t be able to work out any air pockets very easily. At the seam, you might have to get your hands a little goopy and hold down the edges for a minute until the glue grabs.

When the paper is down and all smoothed out and just where it belongs, start painting a thin layer of Mod Podge on top of the paper. If you’ve never used Mod Podge before, well…first of all, get with it, sister! But actually, what I was going to say was, this part will probably look a little bit weird …the paper will look all gluey, but that’s ok; it dries clear and beautiful, I promise!

While I was waiting for the sealer to dry, I cut a little strip of felt and glued it around the bottom edge of the can, for the purpose of saving my white shelves from certain scuffed up doom.

At the top and bottom of the can, I used a strip of ribbon to cover the lip, but you could use all kinds of different embellishments here.

next time, I’m photoshopping on some nail polish or something!
And only a few minutes later…Voila!

A few more that I made:

umm…in my world, water droplets are upside down.
And what craft room would be complete without a giant Christmas popcorn tin turned zebra? Certainly not THIS craft room!

ooh, la la!
A few things to keep in mind…
- The glue dries pretty quickly. Make sure you get the paper to lay smoothly before it does. I didn’t get my first few as smooth as I would have liked. They still turned out okay, but the little ripples that are left do kind of annoy me.
- The busier the paper, the less noticeable the ridges of the can will be once the sealant has dried. The seams will also be much less noticeable. (It took 3 pieces of paper to go around my zebra can, but the seams are nearly invisible in all that business).
- You could decoupage a few different papers (or fabric) onto one can…how cute would that be? Or you could stick on all kinds of things…buttons and rhinestones and glitter…oh, my!
- Mod Podge is really drippy, and it’s not always a good idea to have your camera around your neck because you think you’re going to be really cool and take photos as you’re goopin it up. I might have been able to live with the drips on my camera (the thing’s already been covered in glitter for months now), but I learned the hard way that Mod Podge WILL adhere your hair to a camera. The point to all this: wear a bobby pin.
- Mod Podge is still awesome though.
But then…
there was SPARKLE mod podge..

oh, heaven!
Well, these just in no way, shape, or form, match my craft room. But I couldn’t stop.

OMG! They look great. I can not wait to try this out myself. Love the craft thing. you know I do. Thanks for sharing your idea.
Thanks, Britt! :D
TY
Love this!! I will do some for my craft room.
Awesome! I would love to see pictures when you’re done :D
Love them, cool stuff!
I love this idea!!! I love all the scrapbook paper you used and the ribbon, and oh my… did you say SPARKLE Mod Podge?? :D Have I been living under a rock?? I didn’t know this was created and now I must have some. I also like to find cheap ways to organize my goodies and to decorate my home. And I giggled when I saw the Great Value coffee… *raises hand* I’m a cheap-o grocery shopper too, so I have this same coffee can in my kitchen right now! :) Great blog entry.
Thank you, I’m so glad you like the idea! I now save every can! haha. And yes, sparkle mod podge is amazing AND addicting! ;D
This I WILL be doing… I even went through my garbage from last night and took out the can of sweet pees…. love the ribbo, love the felt on bottom of can thought and I LOVE the fact that I too, can take that ugly xmas popcorn tin and make that my garbage can…. AND you wanna know what? I DO have scrap book paper but I think for my black/white and tiffany’s blue scrap room… I might have to make a Michale’s stop for some new paper and Modge Podge. Never used the stuff. Honestly. Thoought about it though…. I am “getting with it” and gettin’ me some!!
Wonder what other ideas I can borrow from you………………….;o)
Hollie
Awesome, Hollie! Beware of the Mod Podge though…it’s totally addicting! I actually find myself LOOKING for things to cover with it. :D (Oh, and I just replied to your other comment about the paint color, too!)
My daughter, Sawyer, and I are having a Mod Podge weekend! We love your ideas using the tin cans and are planning on making some today. How fun! I love to organize and can’t wait to clean up my craft area with these cuties. It makes you look at tin cans in a whole new way :0)
a “Mod Podge Weekend”…that sounds so fun! I hope you and your daughter enjoyed making the tins! Let us know how they turned out! :D
thankyou for sharing your ideas using clean cans, look foward to any crafty ideas u could send to make for fundraising for childrens hospital stall we have.
thank you for sharing your fab ideas using clean soup cans, would appreciate any other crafty ideas yoou can share with me to make for our fundraising stall.
[…] lovelies are from Things that Sparkle. Aren’t these adorable. Just some pretty paper, ribbon and ModPodge and you’ve got […]
Hi there, I don’t know who’s tried this, but I heard you can combine equal parts Elmer’s white glue and water to make your own Mod Podge. I think I also saw it on Pinterest, or different versions. I haven’t gotten around to trying it yet, but now I know what to do with my coffee cans! (I used to use
Pringles cans for storing crochet hooks, and decorated the outsides too, but I like your ideas better!)
Thanks so much! I bought four recipe holders that turned up damaged and I needed to cover them over with nice paper. This will do perfectly!
[…] Upcycled Craft Storage from Tin Cans… […]
Why recycle when you can upcycle?! :)
[…] Revamped tin cans […]
[…] Source/Tutorial: theornamentgirl […]
[…] Source/Tutorial: theornamentgirl […]
[…] Zebra Trash Can from The Ornament Girl is only one of the multitude of design ideas you could use to make your own popcorn tin trash […]