
Recycled Christmas Card Ornaments
Last week I came up with a pretty cute way to recycle old Christmas cards into ornaments. I have a tendency (and I know I’m probably among many) to hang onto Christmas cards forever and ever, even though I rarely ever look at them again, and the collection just keeps getting bigger and bigger every year. It’s hard to throw them away though. Some of them are so pretty.

I thought making ornaments out of them would be a fun way to use up some of them, and actually get to SEE them again.
I came up with the idea to combine the recycled cards with jar lids because I actually had a couple of them sitting here, after I’d used the jars they came from for storing some craft supplies. Only problem was that once I started making these, a couple of jar lids wasn’t enough for me. I got all carried away and started taking lids from some food items that we hadn’t actually used yet. So, we had to hurry up and use that stuff like, that day. (Ki-ids! Dinnertime! We’re having salsa and a jar of pickles!)
Here’s what I did:
Use your lid to trace the part of the card that you want for the ornament.

Cut it out.

Don’t glue it in yet…first, the lid needs a hole for it to be able to hang later. I used a nail and just gave it a couple of whacks with a hammer, and that did the trick. Just make sure to put something underneath, like a block of wood, to protect your table from getting a hole too.

Here’s what you’ll have:

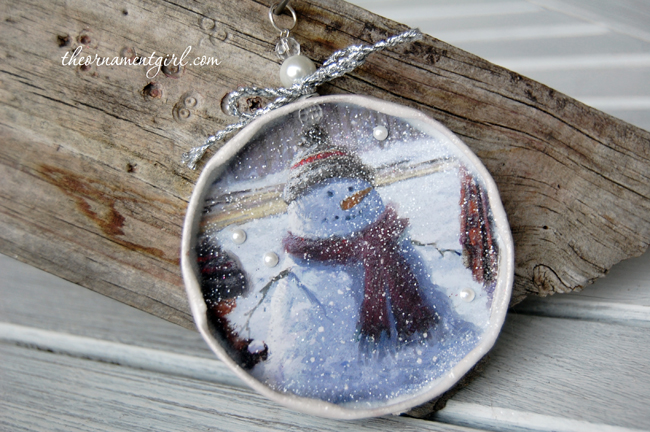
The problem I found at this point was that the hole was kind of jagged (so be careful), so I decided I would cover it with an eyelet after I painted the lid (this is the eyelet set that I have). Since I used a snowman card, I painted the back and sides with a pearl white acrylic paint (it took 2 coats to cover the orange)…

…and after impatiently waiting for the paint to dry, I glued in my card circle, and then I put the eyelet in the hole I’d made. I couldn’t get it to lay perfectly flush, but it was good enough to cover the jagged edge and it made the hole look much nicer.

So this is where you can really start getting creative with your embellishments and do whatever you want to match the card you’re using…I touched up the front edge of the jar lid with the white paint (because that was the edge I’d sat it on earlier to dry from the first paint job), and then I coated the whole inside of the lid and the edge with matte Mod Podge. I did a thin coat on top of the card circle, and I went heavier with it on the inside rim.

I did that because I wanted to add a little bit of white glitter across the surface of the card to give it just a touch of sparkle, and then I wanted a thick layer of glitter around the edge, so the picture looked like it was framed in snow.

For a hanger, you could knot a piece of ribbon through the hole if you want to keep it simple… I like making things more complicated than they need to be so I made a little beaded drop to hang the ornament from. I just added a bead to a head pin, and put the pin up through the grommet from the bottom…

…and then added a couple more beads…

…and then twisted the end of the pin into a loop using needle nose pliers. After that, I added a jumpring.

I tied a tiny piece of silver trim around the top, added a couple of flat backed pearls, and voila! I wish my photo showed how sparkly it is…I think it is going to look pretty awesome next to the lights on the Christmas tree. :)
Here is another one I did. I added purple trim around the inside, and a second hole at the bottom to make a little beaded dangle.

Do you have any other ideas for these? Please post em here!
What a great idea for using the cards! I can’t wait to make these with my children!
They will love it; my daughter did! :)
This is so cool, I have saved my cards too, but I have a different idea! These ornaments are a very good idea, we all have jar lids, and your embellishment of beads is very pretty. And yes, these will
look so good on the tree with the lights on! Keep up the cool work !!!
Thanks Peggy! What is the idea you are planning for yours? Would love to hear it!
I LOVE these!! I will start collecting lids right now! I always make my family members one ornament each year, put their names on it and use them as gift tags on a present. I will try this project for this year, thanks, Ornament Girl, these are so cool!
You’re welcome; so glad you like the idea! :D
Who doesn’t have jars and lids lying around waiting for a great craft idea? You could also decoupage the back in wrapping paper! Where have you been? I was worried looking at wonder woman for such a long time! Hope all is well.
Thanks, Elaine! I’ve just had some things going on lately, but all is good!
And I like your idea for decoupaging wrapping paper on the back WAY better than painting it…I am going to try that. Thank you for the great idea!
Can we use our children’s pictures instead of christmas cards?
I think that would be a great idea!
I just got married and I am using my old wedding cards to make anniversary ornamnets for couples. This is such a great idea and so many options!
Natalie, wow, that is a fantastic idea!
Hi Staci Ann, I also save cards. This is a great idea of how to use them. I have old cards from loved ones that have passed and some from my grownup (lol) kids from when they were young. Couldn’t you also include on the backside of the lid their signature(s)? Just a thought.
That is a wonderful idea!
What a fab idea!
Thanks for sharing, I can’t wait to make some with my children this year.
Christmas cheering from Denmark
Thanks, Charlotte! :)
i noticed u had 3 for 25 but now cant find it wanting which ones i can get
Hi Margaret…it is right here: http://www.theornamentgirl.indiemade.com/product/quilted-ornament-pattern-bundle-my-3-most-popular-ornament-tutorials-save-5?tid=3
:)
These are so pretty. I keep all my cards, I even have a lady at work that gives me ones she gets instead of throwing them out. I have a huge stack and was trying to figure out ways to use them and this is perfect. I already have a collection of lids going for making bird feeders for the winter but I think I might snag some to make ornaments. Brilliant :) Thanks for sharing.
That is a really cute idea! Now I know what to do with my favorite xmas cards…thank you soo much!
You are welcome! :)
you r one cool lady and crafty also love all of your things
thank you! :)
If you’re really sentimental, like me, you could also use a permanent sharpie marker to write the name of the person who sent that particular card to you, along with the year it was sent…”Linda 2012″, for example…on the back side of the jar lid after painting it!
Teresa, that is a TERRIFIC idea! Thank you!
[…] third tutorial comes again from The Ornament Girl’s Blog. This one is called a Recycled Christmas Card Ornament. I love the idea of using something that already exists and recycling it, or as some call it, […]
This idea might also work on used canning lids. The only thing is you wouldn’t have that lip around the edge but you could do things like run a bead of tacky glue or hot glue around the edges and sprinkle glitter or cover the edges in. You could use colored cording, ribbon, buttons, beads, etc., etc. I like this idea but I don’t have any empty jars, yet (also no used canning lids either) to use and only 1 card so far this year with no promise of more. I will hold on my card this year until I have an empty a jar. I love making home made Christmas ornaments.
Nancy, using canning lids is a great idea. I really like your idea of using something decorative around the edge. You could punch the hole somewhere near the top, instead of doing it inside the lip of the jar lid like I did in this post. I think that would look fantastic. Thanks for sharing the idea!
I have used canning rings for years. I cut their picture out, put the lid in the ring as you would a jar. Hot glue it in. You can put anything on the back. I put name, date, state. and each year made each child one and watch them grow. Put the picture on the flat side and you have a little gold frame. You can put ribbon, sparkly garland around the sides. Any scrapes you have. In the hole which you have already, tie a ribbon long enough to go on the tree branch. EASY
I cut the message, or sentiment out of the inside of the cards and mod-podged it onto the top of the lid, so it is two sided. On a few, I mod-podged the signer of the card on the back, a kind of walk down memory lane. Sadly, a relative who had sent me a card last year had died, but I still had her card from last year (of course, I too cannot throw them away) and put her signature on the back. I love it.
I am so sorry to hear about your relative, Lorraine, but your idea for saving her signature is an incredible one; thanks for sharing it with us. :)
I love this! I’ve been looking for years for a great idea for my hundreds of beautiful card I just can’t throw away .this is so cleaver , thank you.
You’re very welcome, Kathy, thank you so much! :)
I love crafts and since I am bed bound this works out fine. I love your ornaments and hope to make some real soon. Your work is so clever and pretty Thank you so much for all your help.
Thank you so much for being here, Edith… I hope you enjoy making them! :)
If you get frozen juice can lids, you can basically do the same thing, but if you don’t paint the backs or put a hanging thing on them, you can add a magnet to the back side, to make Christmas magnets for refrigerators, to give to grandparents as gifts.
Awesome idea, Lauralee, thank you!
This is great. I’ve been looking for a good visual tutorial. In grade school, we did something similar with our school pictures and my mom still hangs it on the tree. So I decided I wanted to let my own girls make one for themselves this year. I can’t remember if we had used a regular jar lid or a canning lid in school but either will work it seems. Love the beaded embellishment too. :) Thanks!
Can plain old white liquid (noname dropping here ) glue be used in place of the mod podge?
[…] recycled Christmas Cards into an ornament using this tutorial from the Ornament […]
Another idea would be make small “trees” by putting magnets on the back and shaping them into a tree on a painted cookie sheet. That way the “tree” can be changed. You could do a candy cane, snowman, etc.
What a cool idea! You could glue all sorts of fun glittery things on these or use family photos! I’m always upcycling Christmas cards, love to find something new to do!
I absolutely love this idea! I’m going to donate my homemade ornaments to a nursing home, spouse abuse center, or any charity that might have limited funds to spend on decorations and of course I’ll keep a few for myself!
Your idea is absolutely amazing and you did a great job! I’m really bad at this kind of craft activities, but I really admire people who are!
I made ornaments with lids back in 4H in 1974 or 75. We had a lid from a mustard jar. on the inside I had glued in a little tiny Santa and a little reindeer and sprinkled in white glitter. I still have that ornament. When i moved out in 1984, that was the one ornament I HAD to have :) thanks for sharing your idea. I love this as I hate tossing the cards. Something else that can be done is too make a mod podge collage on a wooden tray using the cut out parts of the Christmas Cards. Makes a nice tray at the holidays for little bowls of candies :)
I was just introduced to your fabulous ornament site. I don’t craft so would like to purchase ornaments. I loved the American flag colored ornament but now can’t find it. Could you advise ne of price and show the picture again. Thanks. Marlene
Have you ever made a Kissing Ball?? You cut out circles from the cards and glue together. I’ve seen the instructions here on line. My Grandma used to make them when I was a kid (in the 60’s)!!
Yes, I have made them…. they’re so fun! I made one using tiny snowflake cut-outs, and it came out pretty cute. :)
Your work is awesome. I love it. I could have sworn the pumpkin was painted.
I was getting ready to toss some lids, not now!!!
Thank you, Ann!
[…] beautiful decorative Christmas tree ornaments from your old Christmas […]
[…] Recycled Christmas Card Ornaments – … – Create beautiful Christmas ornaments out of your old greeting cards and recycled jar lids. […]
Like your ornament ideas!
I am going t0 try Thankyou I am sorry because idit not know how to spelling in ingles good i am trying my best
I laughed out loud when you said dinners ready,salsa and pickles. Thank you, made my day
[…] Upcycled Christmas Card Ornament from The Ornament Girl – This look so pretty and how clever to use that as the base! […]
If you want a bigger ornament you can use old CD’s as your surface to glue card cutouts on. Leave the back partially or completely exposed and the shiny surface will reflect your Christmas lights. Hang on the tree or in groups in a doorway or archway.
[…] to use or give as gifts. There are many options for making ornaments such as using wood circles or jar lids. You can also just cut them into circles or other shapes and add glitter or other […]
This is a cute idea. Has anyone done this and added glitter with clear window in front? Thinking of using the canning lids to do a snow globe effect.
[…] This one is called a Recycled Christmas Card Ornament. […]
[…] Recycled Christmas Card Ornament Tutorial by The Ornament Girl […]
[…] Recycled Christmas Card Decoration Tutorial ornament girl […]