
custom wedding ornaments…
I just finished up an order for some custom keepsake wedding ornaments…the customer was the mother of the bride, and she emailed me months ago asking if I could make some ornaments for her out of some of the materials she had. I told her I was up to the task, so she boxed ’em all up and sent them to me! Unfortunately, she had to wait for a couple of months because of my waiting list, but she couldn’t have been more patient, and at last, I am finally finished with them. :)
Here are all the goodies she sent me:

There is a sheer green chiffon tablecloth from the wedding, along with a matching satin table runner, which both match the color of the dresses that the bridesmaids wore. She also sent some chiffon and satin lipstick fabric from her own dress, and a spool of ivory ribbon which was the same color as her daughter’s wedding dress. There were some pearl floral picks and some tiny chiffon pouches, and she even sent me an invitation so that I could get an idea of the overall look.
She decided she would like 3 ornaments made: one focused on the bridesmaid’s colors, one focused on her dress, and of course, one to match the bride.
I started with the bridesmaid’s ornament, and used the satin tablecloth, accented by the ivory ribbon….since there was such an abundance of these materials, I was able to make this one using the traditional “quilted star” pattern (which is layered, and therefore uses a little more fabric). Here it is before I finished the top:

Next, I worked on the mother of the bride’s ornament, which was the most difficult for me, because there was the least amount of fabric to work with. Though there was plenty of lipstick chiffon, there wasn’t much of the satin. I had to keep it very simple, to make sure that I was able to cover the ball. I had to use my extremely limited math skills for this one! I measured the ball, and drew myself a pattern, and away I went…

drawing my pattern

as you can tell from my center mark, I was a bit off…but it worked!
Six of these went around a three inch ball, which I then trimmed with ivory satin trim.
On to the bride’s ornament…I was aiming for simple and elegant, and I thought it would look really nice if I made the entire ball in only ivory, and then accented the top with the other colors used in the wedding. I went to JoAnn’s to look for some bridal satin, and as it turns out, there are actually about 37,000 different shades of ivory and off white. (who knew??) Luckily, I managed to find a satin in the exact same shade. ;-)
I prepped my styrofoam ball by drawing my pattern and then cutting it out it with a knife. Unfortunately, there was one styrofoam casualty, but I got it right the second time:

this is really not as easy as it looks!
With the ball portions finished, I got started on the toppers, which was probably the most time consuming part…but I am SOO happy with how they came out. Using all of the chiffon materials, I made bouquets of tiny flowers to cover the tops of each ornament. I even used the little chiffon pouches to make ivory flowers (and saved the ties for the ornament hangers!):

These pouches are pretty small, but I tried to get as much use out of them as possible.
After cutting dozens and dozens of tiny circles and hand sewing them together, I had lots of little flowers…

I thought these really came out pretty :)
Last but not least, she told me that her daughter and her new husband were both horse enthusiasts, and she had sent along some tiny horseshoe charms that I could use if I could think of something to do with them. I decided to detach the larger pearls from the floral picks she had sent, and make a dangle with the horseshoes, which I attached to each ornament:

and so, without further ado, here are the finished ornaments:

the bridesmaid ornament

the top view

the mother of the bride ornament

the top

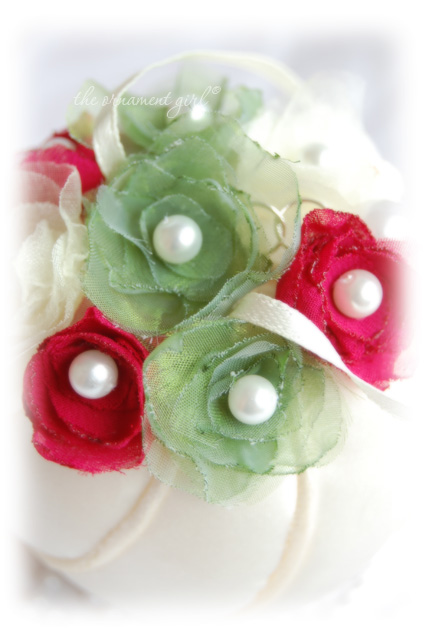
the bride ornament

and the top…
And that’s it! Other than the addition of a few small things, the ornaments were made almost entirely out of the actual materials from the wedding, making them absolutely fabulous keepsakes!
If you are interested in making your own ornaments to commemorate a special occasion, I’ve got lots of ornament patterns available right HERE. :)
Wow! They’re lovely, and I love that they’re made from the wedding elements…
Ma’am, the ornaments you make are absolutely amazing. After reading an article in Southern Lady about your business, I was inspired to try my hand at this craft as well. I am not good at it (just love messing around with fabric), I’d rather log on and enjoy your creations. God, bless you.
These are absolutely beautiful. You did a wonderful job and I am sure the recipients will love them!
Wow! They are absolutely gorgeous! I love the simplicity of the design for the bridal ornament (simple yet elegant :)), and the hand sewn flowers with the pearls are beautiful.
thank you!! :)
these ornaments are absolutley beautiful!
I emailed you a week or so ago about a custom quilted ornament that I would like to have made for my future wife. I never heard back from you so I was thinking maybe you didn’t receive my email. Can you please contact me about this ornament through the email (slneely88@yahoo.com). Thanks so much for your help.
Sabin
Hi Sabin…I think I am having some issues with my contact form on the website…you are not the first person who has told me they’ve had trouble reaching me. I will email you directly…thanks! :)
Hey I am loving the wedding ornaments you made in for that wedding. Today was the first time I had seen them. They for sure have the wow affect.
We’re so glad you are loving the wedding ornaments!