
How to make an ornament from silk flowers.
A few months ago I added some flower pomanders to my shop, and I had promised to write a DIY for them…I know it took me long enough, but here it is, finally.
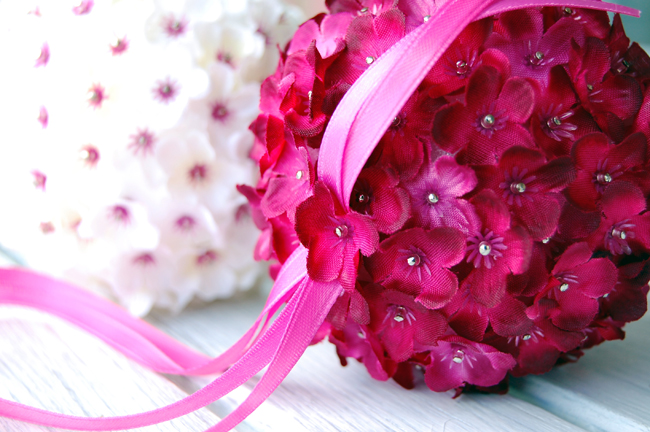
These are so easy to make, and they come out really beautiful. I made this one in a smaller size with tiny flowers for an ornament, but you can use a larger Styrofoam ball with bigger flowers to make a wedding pomander instead. Or…how about wedding pomanders, and then smaller ornaments to match, for wedding favors or bridesmaids’ gifts? I think that would be awesome.
Here’s what you’ll need to make one like mine:
- A Styrofoam ball. (I used a 3″ ball for this ornament)
- A bunch of straight pins
- Craft glue
- Seed beads
- Scissors
- Ribbon
- Silk flowers. The amount you’ll need depend on the size of the flowers and the ball you’ll be covering of course, but for mine, I used tiny little cherry blossoms that I found at Joann’s (they have them in a few different colors) and it took me about 2 bunches. Each bunch only cost about $1.50, so this can be a pretty cheap little project.

All you need to do is pop a flower blossom off of its stem:

And then snip off the plastic backing, staying flush against the back of the flower:

Make sure to keep the little plastic stamens in the center of the flower (this is the back view):

Now thread a seed bead (I used iridescent pink beads) onto a straight pin, and then stick that through the center of the flower…the little plastic stamen will keep the bead and pin from slipping right through the center of the flower:

Dip the end of the pin into a little glue (I like to use old medicine cups for this):

And start pinning them to the Styrofoam ball. I really wish this was more complicated so I looked cooler.

Just keep pinning…just keep pinning…

And feel free to go pour yourself a Blue Moon.

To make a hanger, just pin one of your flowers through a loop of ribbon before attaching it to the ball. I used narrow satin ribbon, doubled up, and left a few inches hanging loose at the end because I thought it looked pretty.

And that’s it! Super simple, super pretty, don’t ya think?

I used this same technique and make a large baby rattle for a shower. We pot it on the front door and it was a great hit.
Simple but very pretty and my youngest daughter loved it
That sounds like a really cool idea!
Wow. I’m impressed. A friend of mine is getting married & I think I’ll make some of these 4 their 1st christmas 2gether!
That’s a great idea. The possibilities are pretty much endless…you could make them in the colors and flowers of the wedding. :D
These flowery kissing balls are just so pretty! I can think of so many ways to use these beauties! I love the little seed beads you chose for the centers of your flowers!
Just stunning!
Thanks Yvonne! :)
[…] holiday kissing ball The Ornament Girl […]
Very Beautiful! I am loving checking out your ideas and crafts. Ornaments are great keepsakes and so personal!
Dan Ornaments
http://www.ornamentsandmore.com/familiesandlargegroups.aspx
[…] how to make a wedding pomander, kissing ball, or ornament with silk flowers | DIY Christmas: Christmas Ornaments for Kids – Martha Stewart Decorate the tree with merry ornaments filled with holiday treats. Cones can be cut from plain colored paper or from greeting cards. To create, draw an arc onto a corner of the construction paper or card using a compass opened up as wide as it can go. Using a pair of pinking shears, cut inside the line. Roll the paper into a cone and staple; reinforce with tape along the inside seam. most favorited all-time <b>It’s eye candy, but maybe not seating. […]
I’m going to make large ones for my wedding reception. Do you think I could put fishing line to hang these from the ceiling? I’m afraid the pin will fall out and it’ll fall on someone!
Try adding some glue to the pin before you pin… that should hold it securely. These are pretty lightweight. :)
really liked your creative ornaments. they inspired me to make some of my own for my tree this year. May your holidays be the most wonderful yet
Thanks, Tee :)
How many kissing balls did the two bushels make just one? Thinking of making for a friends wedding and we are on a tight budget. Just trying to plan out. I know you can get the styrofoam balls at the dollar tree, so the most expensive might be the flowers itself.
It took about 1 and 1/2 of the bushes to make each one. But, they were super cheap on sale, so the project was very inexpensive. :)
I am going to use this tutorial for my wedding. What kind of flower would you suggest? My colors are yellow (vibrant like a sunflower or daisy) and navy blue? I want this for the ends of the pews, then later will move them to the reception to hang on the backs of the chairs. I would love to do blacked eyed Susans or sunflowers but can not figure out how you would pin those. Any suggestions?? Thanks.
I was looking for christmas ornament ideas and saw this… adaptable.. but for your question for the bigger flowers I would maybe pair them with a small flower then add one on either side ( or only one side if you would like) and for pinning I would rim the center with a ring of glittery pins should work nicely.. but you’ll have to do a prototype or two to experiment… I’m sure you’ll create something gorgeous this technique seems rather forgiving
[…] At the Ornament Girl website, you’ll find unique handmade ornaments, patterns, and kits, as well as tons of free ornament tutorials. Just in time for spring is a new blog on how to make a wedding pomander, kissing ball, or ornament with silk flowers. It’s free and you can sign up here. […]
I am going to use this idea for my daughter’s sweet 16 party. We are going to take mason jars and break open a glow stick pour it into the jar and put the lid on then we going to do just half of the kissing balls and put on it lid. You will have a glowing base with a pretty arrangement. O Since I live in Ky and she is a huge Ky Wildcat fan we are doing the royal blue and white
That sounds gorgeous!
Wow!! I saw some of these for sale on a wedding site and thought to myself “Ill bet I could make those” I cant believe how simple this is!! Thank you sooo much you just saved me $75 lol :)
I’m so glad to hear that, Heather! :)
Thank you for this great pattern! I used it to make kissing balls to decorate the church pews for my daughter’s wedding. I used a 4″ styrofoam ball so they were a bit bigger. Looked great! Thank you.
Awesome!
How would I do this with faux pearls? I’m thinking about alternating fresh hydrangea kissing balls and pearl kissing balls to line the wedding aisle. What do ya think?
This is the first time I have seen this website and I am truly amazed thanks so much for the brilliant ideasxx
Thanks, Sandra!
I absolutely love this! I was thinking you could even go so far as to paint the pin heads with just about anything you have on hand (paint, nail lacquer, spray paint or even dip the head in glue and then into some fine glitter) to add a colorful detail or hide the pinhead!
If i wanna make these and hang them from the ceiling as decorations for a part how to i make sure that the ribbon doesnt loosen and the ball falls? I dont think a simple pin is the way to go, HELP!!!!
I’d use a good glue along with the pin for some extra security.
[…] My DIY Wedding Day Accents and petals Parties for pennies The Ornament girl […]
[…] How to make a wedding pomander, kissing ball, or ornament […]
[…] How to make a wedding pomander, kissing ball, or ornament […]
How would you attach these to, say, a long candle stick to turn it into a centerpiece?
I just love these. I have so many flowers pieces and can’t wait to try this.
Have fun! :)
Many (many) years ago, my oldest sisters attended a high school prom carrying floral kissing balls. I was so in love with those flowers and your ornament is a miniature replica and I can’t wait to get started on some. Thank you thank you!
Thank you Sharon, enjoy! :)
Love all your simple ideas. To some of us, we can see through your explanation, and imagine ourselves doing them too! This way we feel productive. Thanks for the tutorial! Love your work.
Thank you so much Sandra, I’m really glad you like the tutorials, and I hope you have fun making them!
I really like this idea and will work on some of these!! Great idea!!
Have fun making them! :)
What a great idea. Of course I like all your ideas. Thank you!!
Thank YOU, MaryBettie! :D
I LOVE that it looks so complicated, but is actually so simple! I think I even have everything I need to make this without going to the store, and this is a lovely way to use up some of my craft supplies. I can even imagine making these for all the mothers at our church (we have a small congregation) as a gift our Sunday School kids could do. I think I just might clean out some stuff and do just that!
Joy, it’s funny you say that…. that is exactly what got me inspired to do these in the first place. I had SO many flower bouquets, SO many beads, and I just wanted to use up some of them (so I didn’t feel too guilty when I went to buy more, haha). It’s a great way to use up craft supplies. I hope your church enjoys the project! Let us know how it turns out. :)
Or another idea … these would be a lovely gift to hang on the doors of each room in a nursing home!
That’s a beautiful idea. :)
So tickled to find this email this evening. This is a cute idea and a neat way to reuse old flowers.
So glad you like the idea!
Thanks so much for sharing your lovely ideas (and instructions) to make this ornament. Finally one I can make, since I only have the use of one hand. I always look forward to your emails, your ornaments remind of those my Aunt used to sit up night after night making for many years.
Wow, that’s such a compliment, thank you so much! I hope you enjoy making them. :)
Great idea, and so easy!
[…] how to make a wedding pomander, … – This step by step tutorial will show you how to make gorgeous pomander/kissing balls for weddings or decorations, super easily and cheaply…. […]
You are too cool – have another Blue Moon and thanks so much!
haha thank you! :D
Created my flower girl ball in an hour…had a ball watching it take shape
That’s awesome!!
Awesome idea, they are just beautiful!
Thank You Stacie, You’ve made my day.
Aww, thank you, Sheila!
Thani you for the inspiration, easy to follow instructions, you work heard but it is rewarded not only for your final product ñ, but ours
Please keep up the good work…. we beautify the world , one ornament st the time
Clara, I appreciate that so much. Thank you! I’m so glad you are enjoying the ornaments :)
How beautiful this is! Thanks so much for sharing this lovely ornament and the steps with us Staci Ann :) It is so appreciated.
Shari, thank you! I am so glad you liked this one! :)
Wow…you did it again – creating unique designs and sharing. How adorable. Again, you are truly the best !!!
Yahoo!! Another RABBIT HOLE for me to visit! I can’t wait to try this … they are fabulous! Next trip out, there WILL be a quick stop at Walmart for some artificial flower sprigs (nearest Joann or similar to me is an hour :( ). Thanks for this super idea, Staci!
What a wonderful idea! I will make them for birthdays and maybe with the flower of the month! Thank you for sharing I can hardly wait to add this to my collection for Christmas also!
Since I started making ornaments, I find it so relaxing, and then I don’t want to walk as much…. Well creativity and walking just aren’t going to hit it together, so I will continue to make ornaments and when my fingers hurt…. I’ll walk????
Thank you for sharing your talent!
I did a few years ago with just gluing to egg-shaped foam for Easter in the different colors and put them in an antique ruffled glass basket. I wish I knew how to insert a picture. They turned out so cute. Thank you for opening up a garden of delights.
This is so pretty Staci Ann as are all your designs. I wish I could access the strofoam balls easily.
I will keep hunting.
I managed to get a couple and did the flying geese ball which I had so much fun doing.
I hope I can source materials and do one of these.
Thank you for sharing your wonderful creations with us and giving us inspirations.
I love these! Did the white stamens come with the flowers?
Hi Donna, yes, it looks like they were attached to flowers before Staci Ann removed them to add the pins.