
DIY Painted Glass Easter Ornaments…
How about some fun glass Easter ornaments for your basket this year? I had actually made a few of these back in the Fall, for Christmas. All the bright blues and purples and pinks were so popular for Christmas this past year, but unfortunately, I never got around to listing them on my website. It just kind of hit me the other day how perfect they are for Easter, too!
If you'd like to make some, here's what you'll need:
- Clear glass ball ornaments
- Rubbing alcohol
- Acrylic paint
- A couple of small paint brushes
- Glittering glue
- Glitter
- Acrylic sealer (the brush on kind)
- Optional – beads or embellishments for ornament lid
Pull off the top of the glass ornament. I stocked up on these from Michael's before and right after Christmas, but you can get them year round online at Hobby Lobby, and I'm sure lots of other places too.

They are always a little dusty inside and out, so before you can paint them, you need to get them clean. I’ve tried all I can think of to avoid it, but rubbing alcohol works best. I hate the smell of rubbing alcohol, with its disturbing similarity to plain vodka. Which I’ve enthusiastically avoided for just about 16 years, after a terrible post-prom experiment where I learned that…well, vodka may mix well with many things, but it doesn't mix well with EVERYthing. Like, together. (hope you're not reading this, mom!) So, I can honestly say that I have tried various other methods of cleaning these guys, but nothing works as well, not even vinegar. The alcohol leaves it perfectly clear, it dries within a couple of hours or less, and the paint adheres better.
So swish a little bit of rubbing alcohol around in there for a few seconds, dump it out (or into another ornament if you are going to use more than one), and that'll do the trick. And while you're at it, how about using a little bit of it to take off any month-old nail polish on your nails, especially if you find that your hands are often making their way into your blog post photos? Sheesh…

They will need to dry out for a little while, and I like to use those little bathroom sized paper cups to turn them upside down and drain into…they work perfect.

After they have dried completely, pour a little acrylic paint inside.

I've used a whole bunch of different kinds of paints, and I've found that some work well, and others don't. One of the types that work really well is the Folk Art Enamel Paint …I used Calypso Sky for this ornament. These paints are super thick though, so you really have to shake it like crazy to cover the entire surface inside of the ornament. I believe this kind of paint is meant to be baked, but I'm not about to try that with these thin glass ornaments. It works fine with no baking required. :D

You can pour the excess, if there is any, back into the bottle of paint, and then let the ornament dry upside down in a cup again…this time it'll take longer, at least overnight.

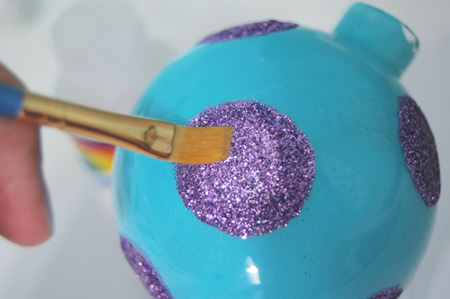
Yay, now the best part… Use a paintbrush to paint a polka dot with glue on the surface of the ornament. I use Martha Stewart Glittering Glue, for no particularly great reason other than the fact that it was right beside the glitter at Michael's. (And I'll tell you what, the Martha Stewart craft section at Michael's is marketing at its finest; I fall for it EVERY time). This glue does work well though. It also comes with a handy little brush built right into the lid, which I do use for a lot for other projects, but for this particular ornament, a smaller brush is definitely best.

Sprinkle on some glitter. I did this one polka dot at a time, because I'm slow. When I tried to paint a few glue dots before putting on the glitter, the glue started to dry too fast for me.

I just used a very soft bristled paint brush to sweep away the excess glitter around the dots as I went, so I could paint on my next one.

If you mess up as you're painting on the glue, it wipes off really easily with a damp paper towel, and you can just start all over.

After this has a chance to dry for a few minutes, paint a thin layer of an acrylic sealer over the glitter. This will help keep the glitter from chipping off after it dries.

Now the lid can go back on. Be sure to squeeze the wires together as you are sliding it on, so that the edges don't scratch the paint on the inside of the neck of the ornament. For mine, I added a little purple bead using an eyepin, before I put the lid on the ornament, just to dress it up a little.

How about a couple more in pink and purple to match?

Some little rhinestones would probably look really cute in between the polka dots, too, don't ya think?
very pretty!…great tutorial, thank you so much for that, and the tips on the products used.
you really do make beautiful things.
thank you so much! :)
very neat, could use to make yoshi eggs too. thanks
You’re welcome!
Love your site. Had a question about using paint in clear ornaments. I see that you are using glass (which I love), but I was wondering if this method will also work with clear shatterproof ornaments. Have you tried it? Our family agreed this year to limit our gift exchange to personal handmade things and I thought that I’d have to worry less about shipping shatterproof ornaments (I guess they’re just clear plastic) rather than glass. Hope you had a nice Thanksgiving. I’ve bookmarked your site and am going to email the link to my friends. ts
Thanks so much, Trish! I have not yet tried the plastic ornaments, but a few other people have told me that they did, and that it worked out okay. The only problem that someone has mentioned so far is that if the plastic gets accidentally dented, the glitter starts to flake off. I was away for the last 2 weeks, but now that I’m finally back, I am going to experiment with the plastic ones myself and see how they turn out…I’ll let you know how they come out! :)
Did you try the plastic ornaments yet? Just purchased some myself and was wondering what you thought. Thanks!
I just finally bought some plastic ornaments and I am going to try it out this week. I’ll let ya know how it works!
Trish,
I tried it with shatterproof ornaments and it does not work :( (which is really sad.) My cat climbs the tree every year. The paint doesn’t stick to it.
What kind of acrylic sealer do you use? Thanks so much.
Terri, the sealer I used in these ornaments was Folk Art…it was right next to the paints and in the same kind of bottle.
Oh-HO, excellent! Now I know the secret to drying round things. :) (Previously thought I had to hang them for days.)
PS: I am positive that Deco Art’s enamel paint (nor ANY acrylic-based paint) is NOT meant to be baked. Just in case somebody feels like trying this… don’t. It’ll ruin the color and probably fume up your house with polymers.
The Folk art enamel paint says to air dry or bake for added durability. I had bought some to paint ornaments, but choose to air dry vs. baking. Baking just sounded scarey for glass. But it does say you can!
Angie, I thought the exact same thing! Especially those thin ornaments.
[…] of your glass with rubbing alcohol. Yes, the kind in your medicine cabinet. I got this tip from the Ornament Girl. Doing this will not only clean the glass, but it will also help your alcohol ink move more freely […]
As someone who worked in a chem lab, acetone (nail polish remover) is one of the best things to clean glass with – it’s a better solvent for oils and it dries faster than rubbing alcohol too. However, it’s at least twice the price and and is another smelly VOC…
Thank you for this great tutorial. Question: Can you thin the paint a little bit with anything, or is that not a good idea? Does it have good staying power once dry? TIA
Hi. I was wondering if plastic ornaments would work the same as the glass ornaments.
I love your tutorials. Very clear and easy to follow. Thanks for the great ideas.
I tried the method you described, however, the paint that I swirled inside the ornament has pooled at the bottom after hanging on my tree. Where did I go wrong??
You have a great and fun personality. Really enjoyed the ornaments, was looking for another way to stick glitter on the inside. Have no floor polish. Thanks.
[…] 16. Painted Ornaments | Happy Hooligans 17. Alcohol Ink Ornaments | Lulabelle Handicrafts 18. DIY Hanmade Easter Ornaments | The Ornament Girl 19. DIY Colorful Hand-dotted Tumblers | Pop Sugar 20. DIY Ombré Glass Ornaments | Ambrosia […]
After a few days my paint seams to crack. I’ve used enamel paint and craft smart black label. How do you get the paint to stay without any problems.
Hi there…. For some reason, some of the paints work better in these than others. I think the enamel paints are a little more difficult, because they are meant to be baked. (Even though, a few of them have worked fine, like the ones I used in this post). Some of the regular acrylic paints are much easier and don’t crack. I hope that helps a little. It is kind of a hit or miss, and a little experimentation is needed with some of them…