
Shabby button and pearl Christmas ornament
Okay, well, I’ll admit that it isn’t looking so good for my 12 Days of Christmas ornaments project. It’s beginning to look more like a “6 Days before, and another 6 Days after, Christmas…maybe…” project instead.
But noooo! I’m not out yet! I will go down in red and green and glittery flames before I admit defeat.
Anyway…I am doing this for a selfish reason. When I did my craft room makeover earlier this year, I came to the conclusion that I have entirely too much craft stuff. So I need to use up some of it. So I can feel less guilty when I buy more.
Like buttons. I have a gazillion buttons. I have so many flippin’ buttons, and I don't even know why. They are just so cute and pretty and Joann’s has that one whole aisle of them…. And I find myself not resisting them and even buying a button for no reason, just because it’s pretty and because you never know, I might need it one day. You know, like if my sweater loses one or something. And then it will be a VERY GOOD THING I HAVE THOSE 25 MILLION BUTTONS.

And, yes, I know that a lot of clothes come with their own spare button. And I’ve got all those, too.
I also have lots of beads. I have some really pretty glass pearl beads that I bought for something at some point, and here they sit:

(I have problems. Future husband: I feel sorry for you.)
And so, here follows my third handmade ornament project, meant to clean out lots of your button stash, and force you to replenish it on your next craft store run. I'm totally looking out for you.
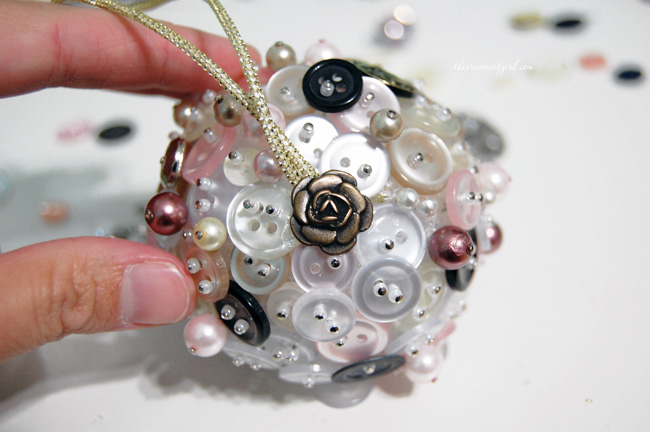
For my ornament, I used a bunch of pearly buttons in pink, ivory, white, and a few almost black ones. I also used some pink and champagne glass pearls, clear seed beads, some pearl head pins, and some straight pins. I used a 2 1/2″ Styrofoam ball for the base, about 10″ of trim for the hanger, and glue. (My favorite glue, as always: Beacon's 3-in-1 Craft Glue.)
Use the pearl head pins and straight pins to hold the buttons into the Styrofoam. Since the straight pins will go right through the holes in the center of the buttons, stick a seed bead on first. This willll keep the button from slipping right off of the pin. Dip the ends of the pins into a little glue before sticking them into the foam.

(Holy horrifying nails Batman! Sheesh, if my nails get any ickier, I'll never have a future husband to feel sorry for.)
So, just keep adding buttons, overlapping them a little in some places.

There will inevitably be spaces here and there between the buttons. You can fill those in with your beads, or by layering a fancier button on top.

And just continue covering the ball:

It was about this point that I started getting really excited at how this was going to turn out. I hope you get excited at this point too, because you might need the motivation…it ended up taking awhile to cover the whole ball.
But…isn't this so cute?
This is one busy ornament, so I just used a simple piece of trim for the hanger. Just stick a pin through the ends, and pin it (with glue) to the styrofoam ball…then just cover the ends with a big gaudy button.

p.s. check your buttons as you’re putting them on. I was halfway done before I realized my ornament said “EXPRESS” on it.
p.p.s. That button had to be at least 10 years old, from back when I wasn't spending all my money on craft supplies. Now I shop at Kohl's. When I have the 20% off all-day shopping pass.

My daughter even made one. :)

How lovely – thanks for sharing.
you’re welcome!
Those are gorgeous!!! It amazes me how creative people are. Thanks for sharing!
Thank you! And you’re welcome! :)
I think this is really a pretty ball Staci! It’s a great idea! You know I have a lot of my grandmother’s buttons – I was thinking what a memorable keepsake to make from those buttons instead of them being stuck away in a jar. I love it.
That is an awesome idea!!
That is my post right above from anonymous. I forgot to put my name. Duh!!
I’m tired just looking. Just to clarify, you also put glue before you put the pin through the button to secure it? I could just see me, hanging the ornament while all the buttons come tumbling off.
Yes, definitely a little glue before pinning down the buttons is a good idea! I just put a little glue in a little plastic cup or something like that, so that it’s easy to quickly dip the end of the pin in right before attaching to the ball. And use regular straight pins rather than the tiny sequin pins; they will be much more secure. :)
I laughed aloud as I read your description of not being able to resist buttons, and having a boatload of them—what IS it about buttons that captures us? I have buttons that belonged to family and friends at least 3 generations ago (and I’m a granny)—nothing special about most of them, but I LOVE them, and can’t part with them.
I hope you’ll come up with more “button projects”!
Terri, that is awesome that you have buttons passed down from that far back. I will see what other button projects I can come up with!
(Right off the top of my head though, you could put some of them inside a clear glass ornament…. I bet that’d look beautiful on the tree, and make a great keepsake!)
I love buttons- In the city where I live there is a whole store full of only buttons. Its amazing. Thank you for sharing.
Sheilah
I’d love to see that store! And, you’re welcome! :)
How did you attach the shank buttons? I am assuming with a small piece of wire? or maybe just glued to the ball?
I actually just used a little glue on the backs, and then pushed the back into the foam as much as I could. The glue held them in. :)
i love the button ornament. Going to try to make one this winter for my tree. Thank you for your creative talent that you share with all of us. My tree has become totally handmade ornaments due to your sharing. Family and friend53w4s are in awe of my tree each year. Can’t wait to share the button ornament.
Hi Sue! That’s awesome! Thank you! :)
I think the button ornament is cute. Only could you give an approximate about of buttons
As a quilter I not only save all buttons but I also save little gold cords & ribbons & thin pieces of leather from tags on clothing or other purchases. Now I know why I saved them as they will make great hangers for these ornaments! I’d love to see your ideas for leather ideas.
I can’t wait to be accepted in your monthly program!
[…] shabby button and pearl Christmas ornament diy … theornamentgirl.c… […]