
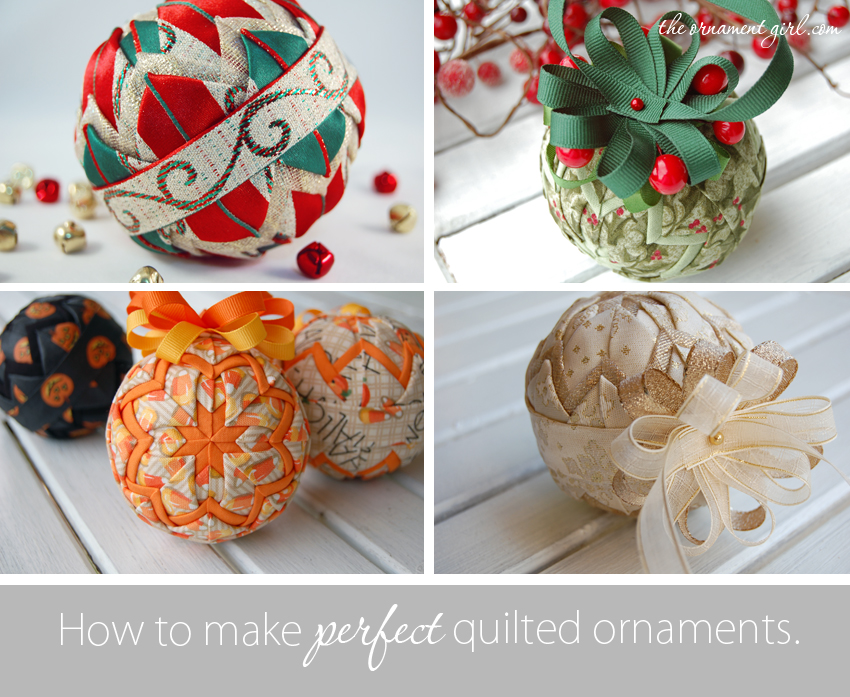
Make a perfect no sew quilted ornament (starting 5 minutes from now).
Not long after I began selling my "quilted" ornaments (in quotes, because they aren't really quilted....they are NO SEW), I started having a hard time keeping up with the demand.... and then people started asking me to teach them how I made them. I hesitated to create a tutorial because the old-fashioned technique has been around for so long, but....
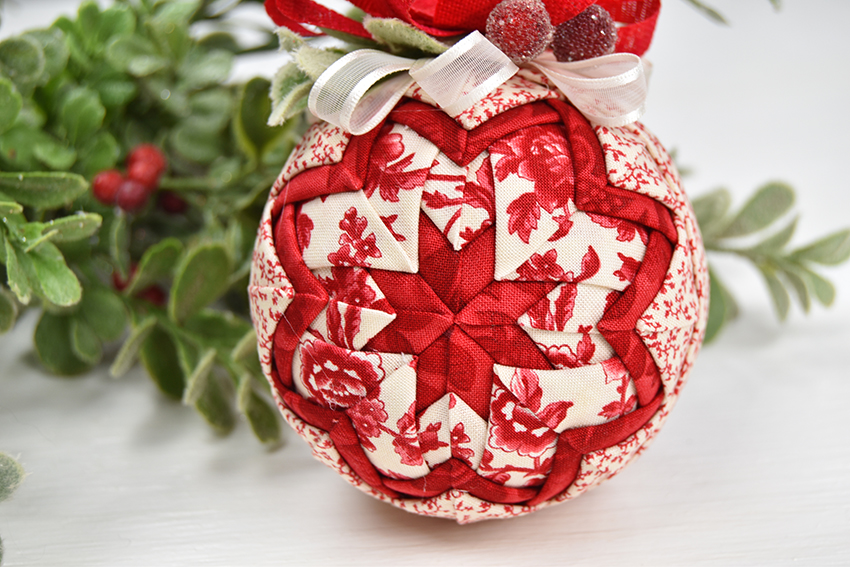
I make mine a little differently (after more than 20 years of experience), and everyone wanted to know exactly what I was doing to get such crisp, perfect lines.
For years, I've sold these instructions as an eBook (it's still for sale, right HERE).
But now, I've got a 3-part Video Workshop. And it's FREE!
You can watch it on YouTube right below. BUT... if you'd like to also receive a Printable Shopping List and Online Supply Buying Guide (with links to all my favorite places to buy supplies!), CLICK HERE. I'll send it all right to your email!

You can make these out of almost any kind of material you can dream up (fabric, ribbon, keepsake baby clothes, even paper), and for virtually any holiday or special occasion. They also make perfect gifts for not just Christmas, but for things like wedding and baby showers (personalize them with matching colors and materials), birthdays, and even sports teams. The possibilities are literally endless. (Here's a gallery of ideas.)
If you decide you would like to try making one of these ornaments yourself, and have any questions at all about the process, or anything else related to quilted ornaments, please feel free to leave your question in the comment section right below this post..... or you can email me from THIS PAGE. I will be glad to answer all questions as best I can!
In case you are wondering...
Q: These look complicated! Will I actually be able to make one?
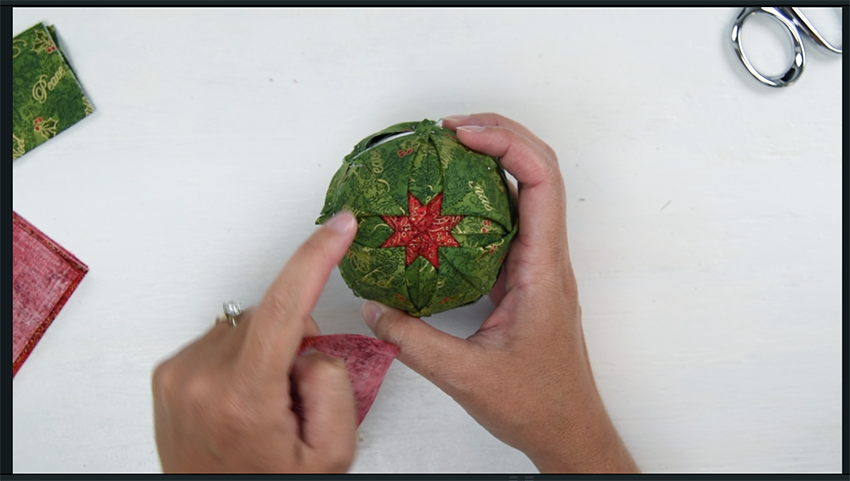
A: Not just one; you'll make lots! Honestly, they look wayyy more complicated than they actually are. The video workshop above will take you through every single step, from start to finish. If you can fold a piece of fabric, you can make these... I promise.
Q: Can I use your instructions to make these to sell?
A: Of course! (And they make awesome gifts, too!) The only thing that you absolutely cannot do is share, copy, or reproduce my instructions, in whole or in part, in any way. (It's against the law, of course.)
Do you have any other questions? I have a list of Frequently Asked Questions right HERE, and if you're still wondering about something, you can let me know below in the comments, or feel free to contact me...I'll be glad to help if I can.
Hey! I bought a couple of your toots! L?VE THEM! I’m having fun on this lazy day! Thanks! But a really dumb question….. Where do you get your ribbon? I have been over a LOT of internet sites looking at ribbon. It’s all waaaay too wide! Help! Where do you get it?
THANK YOU!
Hi Celia.. I’m glad you like the tutorials! Not a dumb questions at all – I get a lot of my ribbon from Michaels, Hobby Lobby, and JoAnns They carry a big selection of the more narrow ribbons.
Also, if you want to buy online, there are lots of places to find it, but to make it easier, you’ll need to make sure you’re using the width in your search. I typically like to look for 1/4″ or 3/8″ ribbons for my bows and hangers. Amazon has a lot of ribbon, and if you type in the width, it will really narrow things down for you.
I hope that helps, and thank you!
That helps a lot. I wasn’t using the widths in my searches. Duh. Thank you!
I wanted to add that I’ve made several quilted hot pads using this same method (well, without the pins) and I bought the tutorials to give me that little extra to make sure the ornaments were just right. They do the job. And then some. ;) They’re well-written and have great clear pics. Wonderful job!
That is so great to hear, Celia, thank you so much!
I found a bunch of ribbon at my local Dollar Tree! You never know where you can find these things lol
I like your ormeamera would like to have the patters
How can I purchase just the November ornament. I really don’t want join the monthly club.
Thank you.
Bi
What size foam ball do you use???? Can’t find 3″ anywhere.
Joann’s Fabrics have 3″
How do I get your download?
I have a very crafty nine year old girl who also sews and bakes besides doing many crafts. Do you think she would be able to make the quilted ornaments?
I am a teacher and we are looking at making the quilted for a Christmas Tree competition. Do you think middle school students could do this 7th and 8th graders. I will purchase instructions if so.
I just bought the instructions, and am wondering why you use rectangles rather than the squares that all the free instructions use? I started an ornament using a free tutorial, and was having problems getting it to work so I bought your instructions. My only issue is that I have 3 ornaments worth of 2.5″ squares already cut, so I was hoping to be able to use them. Is there a way to make those work?
I joined your club recently and hope to receive my first ornament shortly. Do I need to purchase this $10 tutorial?
I’m making the quilted ornament for the first time and have a major question about the measurements on page 36. It says the fabric strip should be about 2 1/2 inches wide but after making the folds it should about 3/4 of an inch wide. Is 2 1/2 inches correct because I have to fold a lot more than a little past Center to achieve 3/4 of an inch.
Just a follow up from my previous e-mail, I just want the instructions for the December kit I just received. As as of yet have not received a reply. I just don’t understand how to put it together. I do not have e=book program. Please let me hear from you so I can decide what to do next.
Hi Staci! Just wanted to let you know how terrific I think your tutorial for these ornaments is. I was trying to follow some of the online tutorials but they just weren’t coming together very well. I thought for a long time about whether I wanted to change spending $10 for something that was probably going to be the same as the “freebies” on other sites. I’m glad to say that not only are your instructions superior in their clarity over what I had already found, but they were actually different than most of what’s out there. The difference in how you do it is why your ornaments look so much better than most of what you see. I couldn’t be happier with this $10 purchase and I’m sure I’m going to be getting more from you. I hope you don’t mind this guy joining your Ornament Girl club. I’ve been crafting most of my life and this stuff brings me calm and makes some really cool gifts. Thanks again!
Jim, I am so sorry for not seeing your comment sooner, but just in case you ever see this reply, I wanted to say how much I appreciate your comment. I am really glad you liked the tutorial and found it helpful!!
Amazing blog! Do you have any tips and hints for aspiring writers?
I’m planning to start my own blog soon but I’m a little lost on everything.
Would you propose starting with a free platform like WordPress or go for a paid option? There are so many choices out there that
I’m completely confused .. Any ideas? Kudos!
I just got my patterns printed off. So excited to start. My question is if I use a smaller than called for styro base is there an easy way to figure out how much smaller to cut fabrics ? Thank you
Thanks for sending my download again. I love your ornaments. I just had a real hard time finding those styrofoam Easter eggs. I looked at Jo Ann’s , Michael, Holly lobby. Bought some from JoAnns, their all out now. Do they sell them all year long or just for Easter?
Hi, do you allow guest posting on theornamentgirl.com ? :) Please let me know on my email
Hello Staci, I bought your pattern awhile ago and I have been enjoying making ornaments since then. My sister asked me to make an ornament for her daughter’s shop but she wants a bigger ball. The question is can i use the same 3×2 cut or bigger? If so, what size? Please help. Thank you.
Are you still selling these? Your last question was in October so I was not for sure if you are still selling these or not.I see you live in Eustis!!
Hi Kim… Yes, I am still selling this ebook! But, I’ve also got a video workshop now too, which is completely free. You can find it here: https://ornamentgirls.com/basic-star-workshop/
And yep, I live in Eustis! I just moved here a little under a year ago. Do you live in this area? :)
[…] if you can fold a piece of fabricyou can make a perfect Stylish Quilted Ornament Pattern Gallery Size: 850 X 697 | Source: theornamentgirl.com […]
I just wanted to say thank you for all of your hard work! Your photos, instructions, and videos are all so clear and a joy to work with. Your efforts and willingness to share your many talents are greatly appreciated! ?
Liz, thank you so much, I really appreciate that!
[…] if you can fold a piece of fabricyou can make a perfect Modern Quilted Ball Ornament Pattern Inspirations Size: 850 X 697 | Source: theornamentgirl.com […]
My daughter is a member She has made the most beautiful ornaments. I’m so impressed and proud of her. Her most recent is she took my deceased husbands neckties and created ornaments for family and pallbearers. They were so impressed and happy to have this remembrance. She is one of your students you should be very proud of.
Oh that is just so amazing, Rosetta. I’m so touched by this! And it sounds like that special ornament she made was so beautiful and touching. She sounds talented! Thank you so much for sharing with us.
I just purchased a box of ornament of the month ornaments. I didn’t realize the didn’t come with instructions. How can I get them for myself? Thank you for your time, Cathy
Hi Cathy, can you please send an email to staciann@theornamentgirl.com with some more information about those ornaments you purchased? Our customer support team will be happy to help.
beatiful
I have a lot of 2 1/2 styrofoam balls. Can I use these and if so what size squares or rectangles should I use.
Thank you for your help
Hi Irene, our patterns are designed for 3″ foam balls and we don’t have an exact formula for adjusting them. It can totally be done though! With a 2.5″ ball, I would keep the fabric sizes the same. You may need to adjust your spacing a little bit, and trim off more when you get to the equator, but it will work out great.